Thursday, September 27, 2012

Apple Pickin and Cookin


     Hello Fall! You may have noticed we are all in pink. This is because Erica's Design Team is showing our support for Breast Cancer Awareness. From September 18 to October 15th we are all outfitted in pink. We are also required to use pink somewhere on our project (even if we have to cover it up). See if you can spot the pink I used.
     One of the things Erica @ My Cricut Craft Room has asked us to do is to create a mini album or Scrapbook with the theme being Fall recipes and have I've got a fabulous one for you. Every fall for the first weekend of October we have a Fall Festival of sorts, it is called Waters Farm Days. This was a homestead that was gifted to the town. In order to keep it maintained they sell real old fashioned Apple Crisp. We are talking serious old fashioned stuff here, lol. In the beginning they sent a copy of the recipe to each household in hopes you would make some to donate for their cause. This is by far the best recipe ever, at least we think so. Let's get started on where it all starts: the pickin'.
     I wanted this lay out to be fresh and crisp, just like the air and the feel of walking the apple orchard. The light green card stock was a perfect back drop since I was using red, green and white and didn't want to look Christmassy. I used the font and font layer from Art Philosophy and cut all layers @ 1". I love the decorative dots on this font. I also found a wonderful border on Elegant Edges. This cut was on page 21 and cut them @ .75" and fit to page. I fell in love with the cross stitching on this border and the shape reminded me of apples except it needed some stems. No problem, I just colored them in with a metallic green sharpie marker.
     I wanted to fill some negative space with an apple and I found it on page 16 of Enjoy The Seasons Imagine cart. I print and cut @ 2.25" and used both the combine and layers options. I changed the color of the apple to a solid red which is different from the handbook. I cut the stem and cute little worm separate so I could add some pop dots and give some dimension. Look at Ben peeking out through the leaves, he's such a character!
     I added a second apple to the layout but this time decided not to adhere it all the way down so I could slide a journal tag behind it. Since I already had my Art Philosophy out, I noticed the tag on page 70 had a wonderful layer that would go perfect with the border. This is on the decorative layer shift keys.
     Here are the 2 pages together. The border is only adhered on the sides and bottom so I could slip a few tags in there as well. I added some twine from The Twinery to the tags. Now, are you ready for the recipe?
     There's my pink! My grand daughter also happened to be wearing a pink jacket, go figure. I decided to add some white cross stitches along the border to the recipe to help tie everything together. 
     If you are looking for some great deals you should pop into Ericas' Craft Room Store. She always has great prices and an extensive variety of products.
     Before you run off to make some apple crisp, be sure to see what other tips you can pick up @ My Cricut Craft Room.


Thursday, September 20, 2012

A Banner Christmas Tree

     I have another great project for you today using the Cricut Craft Room! I really love using this program offered by Provo Craft. One of the great Craft Room Exclusives is Banners. I have used this for tags on layouts and now I made a Christmas card with banners on my Christmas Tree! The entire card was made in the CCR. Here's what I designed:
     Sorry the lighting was not so good when I photographed this but I was so excited to share,lol. First I started with the Christmas tree in the CCR Basics. This is free in the Cricut Craft Room and has many great shapes to choose from, especially if you want to make a quick card. I added this to my mat @ 4" and then opened my Banners cart. I was able to rotate, move and size the 2 banners to where I would place them on my tree and then welded them together. This made it easy for my to know exactly where I would place my additional banners that I was going to ink. Once I knew the exact size of the banners, I copied and pasted them to another area on my mat.
     I just have to say something about a wonderful feature of the CCR. If you place everything on the same mat, when you hit GO Cut, you will notice on the left hand side of the mat you can choose to print, cut or print and cut. This is so versatile especially since I have the Imagine and sometimes want to only print and sometimes only cut. You can also decide if you want to cut all the images on the mat at the same time or separately. Since I knew I would do this all at once I placed my images accordingly.
     I inked the edges of the banner with Brilliance Galaxy Gold while it was still on the mat and also stamped the sentiments with Colorbox Chalk: Lipstick Red. Now all I had to do was add some liquid pearls in Ruby Red and also some stickles in Christmas Red.How do you like my star behind the tree? I had used a piece of scrap paper that had this design on it so, I went with the flow and added some icicle stickles to add a little sparkle! I also added some Candi "brads" in the corners.This was probably the quickest card I have ever done!
     Now I have a surprise for you. Here it is TaDa........


FREE Cricut Craft Room Help Guide!


This is the 78 Page Cricut Craft Room Help Guide.....

When you open Cricut Craft Room now there is a GREAT video that pops up and welcomes you to Craft Room. If you have ever been intimidated by the idea of Craft Room…. NOW is your chance. There is a 4 minute video that welcomes you to Craft Room and will help you get aquainted and NOT intimidated by Craft Room!
It really is great, no matter what your computer skill level is. Please take the first step and try Craft Room if you have not taken that step yet. I have done a few Ustream tutorials to help with Craft Room, but no one can do it better than Provo-Craft themselves! Here is the welcome screen now when you go to Cricut Craft Room.
Here is the link to 
ALL of the Craft Room tutorials that Cricut has made! *Erica
This guide came from www.cricut.com and was assembled by
Erica’s Craft Room™ My Cricut Craft Room™
and Affordable Crafting Concepts™ Copyright 2009-2012

Visit the blog for 6-10 Cricut made projects each weekday.
http://mycricutcraftroom.blogspot.com

     This is a fantastic way to jump into the CCR. I hope you will give it a try. You will amaze yourself at all you can create. Happy Crafting, Mary.

Wednesday, September 19, 2012

Baby Girl Chinese Characters

     Today we are creating projects exclusive to Cricut Craft Room Exclusive carts. I am going to show you a baby card using the Chinese Characters and Craft Room Basics so lets get started!
     This is a really quick and easy card to make. I started with a piece of  8.5" x 11" purple card stock that was cut in half lengthwise for a top fold. The onesie is in the Craft Room Basics and was cut @ 4.0". I love this paper from s.e.i. I used a variety of scraps to create my back ground including the pink that I edged with a Martha Stewart border punch and some ribbon I had laying around.
     The Chinese Character for "Love" was cut @ 1" for both the shadow and the main characters. An easy way to adhere the smaller pieces is to do the following: after cutting the characters, weed out the background like you would do vinyl. I then apply transfer tape while it is still on the mat. This tape is great since it does not lift the paper. After it is transferred, flip it over and apply your adhesive. I used quickie glue since it was great for the small pieces. Then you just position it on your shadow and, voila, perfect placement every time!
     I found a Studio G stamp that I had to add the "love" English sentiment and finished decorating with some Imaginesce rhinestones. I also found some rub-ons that I had from My Sentiments Exactly that went perfectly with this card. Since I love dimension, I had to raise the onesie with pop dots.
     Be sure to check out the Cricut Craft Room. It is easy to use and makes it easy to layout your projects.You can find it Here

FREE Cricut Craft Room Help Guide!


This is the 78 Page Cricut Craft Room Help Guide.....

When you open Cricut Craft Room now there is a GREAT video that pops up and 
welcomes you to Craft Room. If you have ever been intimidated by the idea of 
Craft Room…. NOW is your chance. There is a 4 minute video that welcomes you to
 Craft Room and will help you get aquainted and NOT intimidated by Craft Room!
It really is great, no matter what your computer skill level is. Please take the first step 
and try Craft Room if you have not taken that step yet. I have done a few Ustream 
tutorials to help with Craft Room, but no one can do it better than Provo-Craft 
themselves! Here is the welcome screen now when you go to Cricut Craft Room.
Here is the link to 
ALL of the Craft Room tutorials that Cricut has made! *Erica

This guide came from www.cricut.com and was assembled by
Erica’s Craft Room™ My Cricut Craft Room™
and Affordable Crafting Concepts™ Copyright 2009-2012

Visit the blog for 6-10 Cricut made projects each weekday.
http://mycricutcraftroom.blogspot.com


Monday, September 17, 2012

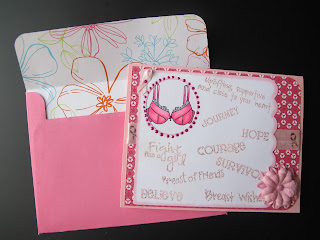
Breast Cancer Awareness Card

  
   Good morning my fellow crafters! Here at Erica's Craft Room we are turning pink from now until October 15 to show our support for Breast Cancer. We honor those who are currently fighting this disease as well as those who are survivors and remember those who have lost the battle.
     I don't think there is a family who has not been touched in some way. For me I have/had a grandmother, mother, mother-in law, aunt and close friend who have fought this disease. My brother in law lost a son to this as well. You are reading that correctly, men also can get breast cancer!
     Today we are to make a card ,of course using pink. I wanted to make a card that would express all the emotions attached to Breast Cancer. That is why I knew I would use the stamp sets from Pink By Design.
      I wanted to use the bra stamp but needed an image with a circular opening. Believe it or not , Tags Bags, Boxes and More 2 had just what I was looking for. It is the card window on page 60 and I cut it at 4". I love the scallop edge so I just inked with some distress ink. The sayings are from Breast Wishes. I embossed these with Versamark Dazzle ink and some Zing pink embossing powder.I also added some Liquid pearls around the window opening. You can purchase these supplies at Erica's Store Here
     I stamped the bra image from PBD "save the tatas" stamp set with Memento ink on X-Press It card stock and used my copic markers to color it in. The colors I used were: RV02,RV04, RV06, and C00,C0,C1 for the lace.
I love the background paper since it matches the bra perfectly and even has a nice sheen to it. It is from s.e.i. Bright Blossom stack. I also had some ribbon with the Breast Cancer symbol on it!
     I had some flowers in my stash that I misted with Tattered Angels Chalkboard Mauve lous and added a brad for the center.
     When I first started using my Cricut I enjoyed making envelopes so much that I made a bunch of them, lol. It just seemed so appropriate to include a pink enevelope! 
     Well that's it for today guys. I hope you enjoyed my card and let's keep on fighting to end this disease. Please be sure to stop back over at Ericas' Blog and see what the rest of the Design Team has to show you.

Tuesday, September 11, 2012

Gift Tags


     Hello Hump Day! Boy is this year just whizzing by! Today Erica gave us the choice to use rosettes or make 3 tags using the feature key. I made 3 tags using 4 different cartridges: Winter Frolic, Sweethearts and Enjoy The Seasons and Snapshot Everyday Imagine cartridges. If you follow me regularly then you know I like to go over the top sometimes however, there are times when I like to tone it down a bit. I also love to use up my scraps and tags are a perfect way to do this. So let's get started.
     A while back I made a cute card with this same monkey image. I loved it so much (and had some of the printed paper left, that I decided to make some tags.You can find this image on the Sweetheart carton page 43 using the tag feature.I believe I cut it @ 2.5". What I really wanted to show you was what you can do if you don't feel like cutting layers whether for a card or a tag and how just a few minor embellishments can make a world of difference.
     First I cut the top layer and taped some twine to the back for the vine the monkey is swinging from. I also added some Liquid pearls for the mouth and black enamel for the eyes. I wanted a warm brown for the bottom layer so this is what I did:
     I laid the shadow tag right beside my top layer with the monkey and made a small pencil mark for where the monkey is. Then I traced the small heart onto the bottom layer. I just smudged some distress ink in the area of the monkey and filled the heart with stickles and outlined it with a gel pen. Now all I had to do was adhere them together. I also used a white gel pen to add faux stitching around the edges. I REALLY love this gel pen that Erica sent me!
    You should really check out Erica's Store. She carries all of the supplies I used here and so much more with great prices too!
     My next tag is from Winter Frolic and Snapshot:Everyday an Imagine cartridge. I recently signed on to sell  a wonderful chocolate fondue at home parties (I'll share more about this in an upcoming post). I wanted to do something special for those who order from me so I thought I'd create a special Thank You tag to package their orders with.
     This tag is on page 46 and I used the tag and tabs. The red base is from my scraps but, since I am in the business of chocolate I thought I'd fill my tag with chocolates!!!!I cut these @ 2.2" which gives you a 3.2" x 2" tag. The companies' logo is in brown and red so these look great to attach to the bags. I needed to add some dimension so I used satin ribbon to make a bow. Incidentally, I love making bows with a fork. You heard that right, a fork!!! Just Google how to make a bow with a fork. There are several U tube videos out there.

     My last tag is made using Winter Frolic and Enjoy The Season. The tree tag is on pg. 48 of the Frolic cart and the background paper is is on the Imagine cart on pg. 41. I didn't do anything special to this tag because I don't want to take away from the gift it is on top of. You don't have to always "dress" it up. Here's why:
     It is for a Christmas ornament! I am doing these for a local store for them to market so I didn't want to take away from the gift but wanted to give it a professional look.
     That's it for today guys. Hope you enjoyed my projects now, get going and use up those scraps! I'd love it if you would tell me what you think. Be sure to head back over to http:.mycricutcraftroom.blogspot.com


Wednesday, September 5, 2012

Cranky Old Man


     Welcome to Theme Day Thursday! Today Erica's Team is focusing on Fall Foliage.I just love the fall. I love the warmth of the sun and the cool crisp air. Fall and Spring are my most favorite times of year. So naturally I had to sign up to do this theme. I really didn't want to do the usual wreath , so when I saw this poem posted on FB by a fellow DT member (Thanks Ray for posting this)I knew I had to do something with this. This was from an elderly man in Australia who jotted down his feelings concerning his life and I found it so powerful I just had to frame it.
     The title is "Cranky Old Man" and I thought using wise old oak leaves would be so appropriate for this. The cartridge I used was Celebrate With Flourish. It has some really nice die cuts on it. All of the cuts are from Fall2 and @ 1.5". 
     First I printed the poem on parchment paper in brown ink then trimmed it to 8"x10". I wanted to fill the white space around the saying so I decided to do some stamping. I used Inkadinkado V.2 and Autumn Leaves flourishes. The green flourishes were stamped with Perfect Medium and then Perfect Pearls patina was applied. I really wanted a subtle background. After that dried I used the Autumn leaves flourishes and Archival Brilliance ink in Coffee Bean for a more dramatic effect.
     I used all sorts of scraps in burgundy, orange, brown and green to cut my dies. Before removing them from the mat, I inked all the pieces. I even stamped some gold and silver inks on the leaves to add a touch of brilliance.The caps on the acorns are from a scrap piece of distress paper that I sanded for a more natural look.
     After all the cuts were glued in place, I used some (OK a lot) of Liquid Pearls to add some dimension to the leaves and background. The colors I used were: hot cocoa, avocado,platinum pearl, copper pearl and onyx pearl. You can find all these products in Ericas Store.
     I placed this is a wooden frame and photographed without the glass to cut down on the glare. I will look at this often as a reminder to be thankful for all the roads I have already crossed and the wonderful journey each day brings.
     Please head back over to My Cricut Craft Room and see what my Design Team Sisters have to share with you. Hope you have a wonderful week end planned.