Monday, October 22, 2012

Beware Of The Ghosts!!!!


     Welcome to Would you Ever Guess Wednesday! Today Erica from My Cricut Craft Room asked us to use gel pens on our projects. When I signed up for this I didn't realize that my gel pens had dried up and I had used up a lot of the colors I had planned to use! What to do? I decided to use my Cricut markers instead. I really wanted to use my Chic and Scary cartridge and thought the phrase for Halloween would be perfect. I also had some adhesive velum and felt this was a great project to use this on. Before I continue I want to give you a heads up: this is not my best work but rather an exercise in what NOT to do, lol.
     I started by using my Cricut marker in black with speed @ 3 and pressure @ 2. I used the CCR and a rectangle shape from George and Basic Shapes @ 4.347"wide by 5.222" high on one layer. Next I used the phrase for Halloween @ 4.083" w by 4.75"h on a second layer. I set my Expression to Portrait mode so the image would be drawn/cut in the upper left hand corner. All I did was replace the blade carriage with a marker and pressed cut. This drew my image. I did not want to cut the phrase but I did want to cut the rectangle, so I replaced the marker with my blade, and cut the outside shape after I hit load last. All the phrase is now outlined in black.
     Lesson one when doing a project: make sure you have all the supplies you need AND that they are in working order, ie, markers that are not dried out. Oh I am not talking about my gel markers, no, that would be the least of it. Being the hoarder that I am, I have had these opaque markers for velum for a long time and finally found a project to use them on. The only trouble is that they must be old because some just wouldn't flow right. (Perhaps dried ink, grrr). I plugged away and thought I will be able to salvage this with some embellishments so not to worry. When I adhered this to some purple card stock it really didn't look too bad.
     The skull is colored with white opaque markers, but since it was a little dried up, it came out sort of grayish. It looked sort of cool especially when I added some green rhinestones for the eyes and some avocado Liquid Pearls for the nose.
     I added this Haunted House using Enjoy The Seasons image from page 15. I used all the layers combined @ 1.25". I added some Black Diamond Stickles to the spider web. So far so good until....
     I added Liquid Pearls and stickles to the spider. Once it was dry, I decided to add some green liquid pearls for eyes to the spider. Yikes what a mess! Lesson two: when using Liquid pearls or Stickles be sure to leave some room in case it spreads out.(It usually does!) Instead of having 2 eyes I wound up with a uni eye! also, if you look at the phrase next to "beware", my web really got mushed together. 
     in order to distract from this boo boo, I added a hanging spider from Happy Hauntings on page 102 and cut it at 2.5". I cut 2, one the adhere to the paper and the second with pop dots for dimension. I did the same thing with 3 ghosts (one I flipped) from page 37 cut @ .75". 
     I kept trying to salvage this by adding rhinestones to the corners and some yellow twine I received from Erica. Although I am less than pleased how this turned out, I'm sure the 2 year old grand son Charlie will love it! From now on I will make sure all my markers are in working order and also be all the more diligent on how I use my Liquid Pearls and stickles!!! I guess I need to replace some supplies over at Erica's Store.
     I hope you have learned from my mistakes (I have!!!). Now be sure to head back over to My Cricut Craft Room to see some spectacular projects my Design Team Sisters have made for you.
     What mistakes have you made? It would make me REALLY happy to hear what mistakes you have made, lol.


Sunday, October 14, 2012

Bat Mitzvah Card


     Hello Monday. Wow, these days are just flying by!!! Fall is really in the air around New England. Here at  My Cricut Craft Room, Erica has given us the option to use the CCR Exclusive carts so I decided to use the Jewish Icons. One of the reasons I love being on Ericas' Design Team is the opportunity to think outside of the box as well as to learn something new. I always have been curious about some of the practices of the Jewish faith. We all know about Christmas, however, about the same time, our Jewish friends celebrate the Festival Of Lights called Chanukah. I will be participating in the Chanukah Hop in December so I wanted to get my feet wet on starting some projects. Since I am Catholic, I turned to several of my Jewish friends to help me on the road to better understanding. I have had the opportunity to attend a Bat Mitzvah and was in awe of the tremendous job the young man did.
     In many Christian religions we have a Confirmation where the young adult learns more about their faith and receive the blessing from their Bishop in the form of a Sacrament. In the Jewish faith the young adults read in Hebrew from the Torah. Boys have their Bar Mitzvah when they are 13 years old but girls have their Bat Mitzvah a year earlier at age 12. This ceremony marks their rise in their religious standing. I decided to try my hand at a card for a Jewish girl on the occasion of her Bat Mitzvah. With the exception of the banner, this card can easily be made for a young man for his Bar Mitzvah.
     I started with a 4.25" x 5.50" white card stock base and added a layer of blue, gold and green striped paper. This reminds me of a "tallit" (prayer shawl). For the Torah I used the following measurements:
Torah: 3.5", shadow: 2.819w by 3.694, pages of the Torah; 1.403x 1.917. I stamped the pages with a script stamp by Recollections with Versamark Vintage Sepia.
     The edges were inked with Rusty Hinge distress ink and I added some gold Stickles to add a little bling. For the Hebrew lettering I cut this @ 1.417"x 1.944".
     I cut the Star Of David for the both main star and background @ 1" and again inked the edges with Rusty Hinge. I decided to add some gold stickles to these as well. I cut a total of 4 stars with all layers. 
     I wanted to add something "girlie" to the card so I pulled out some paper ribbon I had from K&Company and I was so pleased how well it matched the background paper. Lastly I put some pop dots on the back of the Torah before I adhered it to the card.
     I hope you have enjoyed my tutorial on this card. You can always find great supplies like the ink and stickles I have used here, at Erica's Store. Now be sure to head back over to the blog and see what great projects my Design Team Sisters have to share with you. @ My Cricut Craft Room.


Thursday, October 11, 2012

Salute To Art Teachers

    
     Well Hello Friday!!! How ya'll doin'? I have had quite the week. October is a HUGE birthday month for us. Mine was the 4th, my twin daughters' on the 7th and a son-in-law's coming up  next week and a grandson at the end of the month. That spells a lot of cards!!!!
     This week Erica's Design Team was asked to do a project with a teacher theme. Since it's Friday that also means we must make a scrapbook page. I knew exactly which Teachers I wanted to spotlight and I also knew I had the perfect pictures to scrap. I hope you will be as amazed by the talent presented here as I always am when I see the artistic abilities that my daughter has. This talent was greatly encouraged and nurtured by her High School Art teacher: Tura Dudley. They have remained good friends even though my daughter has completed Art College and is currently living in California with her husband and Tura has since retired.
     I am in love with the cartridge Frame Of Mind! This is a very intricate cut and can be found on page 9 and is the Lace cut as well as the Lace Blackout. I cut this @ 7.9" to fit the 4"x6" photo. I really wanted the picture to pop so I added a border cut from All Occasion Cake Art. I used a shiny metallic paper and cut it from the image on page 78 using the mirror droplet lowercase (2"x6"). I did cut 2 of these and lined them up with the edges and placed the framed photo on top. I also strung some twine from The Twinery through the holes. Notice the color is pink. This is because the Design Team is using pink not only in our graphics but also in our projects for Breast Cancer Awareness.
     These flowers are from flower Shoppe and are cut @ 1", 1.25" and 1.50". I used the same sizes to cut the leaves and inked the edges with Peeled Paint distress ink. I wanted to keep the titles simple yet elegant so I used the font from Sophisticated. I used Font 2 plus the shadow and cut all at 1". Lastly I decided to add some flourishes with the gem Stone Flourishes by Inkadinkado with Staz On Forest Green Ink. Of course I had to use some Liquid Pearls and the Hydrangea was perfect!
     You can find any of the products in Ericas' Shop. She always has great prices.
     Are you ready to see one of the projects the "student" created? Here it is:
     I am sure there are projects in your area where they recruit local artists to paint objects that are some what symbolic of your area. We live in the area of the Blackstone River where many people canoe. Local businesses sponsor artists to paint with a certain theme. Unibank sponsored my daughter Christine and the idea was to spotlight the various towns along the Blackstone River Valley which stretches from Massachusetts into Rhode Island.
     I carried the same style font on this page and some of the leftover leaves. The "creating" pencil stamp is by Michael's Recollection Stamps.
     The picture of the sunset is not one of the canoe series but the colors were so perfect I included it in the layout especially since it was showcasing Chris' talent. Here's the 2 page layout:


Wednesday, October 10, 2012

Letter To My Friends On Sesame Street

Dear Big Bird and my friends on Sesame Street,
     You guys know I love you. My 5 children watched you when they were growing up and my 8 grandchildren have also watched you. I fact, this July, we met you in Williamsburg, VA at Busch Gardens. We even had our pictures taken with you.

     Over the years we have bought so much Sesame Street merchandise from clothing to Big Bird stuffed animals, Count Dracula's counting games, puzzles, plates, Dancing Elmo,Tickle Me Elmo ( that was a hard one to find, lol), Zoe, Bert, Ernie, Cookie Monster games, Snuffy, VHS (yes I am that old!!!!), Cd's, DVD's  
and the list goes on and on.
     Today I did not watch you guys. No I had something more important to watch. You see I wanted to know just what happened @ our embassy in Benghazi, Libya. In case you missed it we are at war. Our embassy was attacked and 3 security guards and our Ambassador were killed. Ambassador Stevens was a good man by all accounts. He was trying to keep peace in the neighborhood. He had made many friends but felt there was trouble brewing. I wanted to know what happened. So I watched the Senate Hearings on what transpired.
     It was clear that the requests for added help were repeatedly denied. No more police to help them.It was also clear that there was impending trouble but no one was listening. It was very clear that the denial was from the top. It is also clear the initial reports about what occured and why were false and no one believed it.
     So, my question to my friends on Sesame Street is: Are you ready to spread your wings? Do you have enough money from all that merchandise to make it on your own? Don't get me wrong, I am delighted that we helped you get on your feet and grow but isn't it time to leave the nest?
     I know we don't support you fully but perhaps it is time to spend our money on more important things in this time of economic hard times. Perhaps we could use the money we give you to hire a few, oh I don't know, security guards to keep our troops safe. 
     Please don't be offended. We all have to grow up at sometime in our lives. Nothing lasts forever. At this time, safety is more important.

Friday, October 5, 2012

October 100 Carts Blog Hop


Welcome to Day One of Erica's October 100 cart Blog Hop! If you came from Claire's then you are in the right place. If not then you want to start @ http://mycricutcraftroom.blogspot.com so you don't miss a thing. As you can see we are all dressed in pink for Breast Cancer Awareness. It is so important to have your mammogram done yearly as well as performing monthly self breast examination. Here's hint: schedule your appointment around your birthday that way you don't forget to have it done.
 
     Now let's get down to business. I have some great projects using the following cartridges: Art Nouveau, Best Friends, Better Together and Baby Boutique. I also used Picturesque and Accent Essentials to complete my projects. First up is a card I made with Art Nouveau and Picturesque.
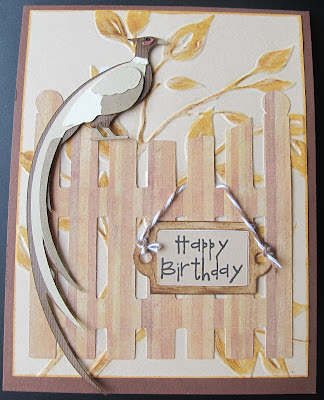
     I wanted to make a birthday card for my husband so this is what I came up with. I used the image on page 65 for the pheasant and cut it at 5" including all the layers. The gate is from Picturesque on page 69 and I cut it @ 3 3/4". The layers are so beautiful with these scrap papers that I didn't even have to do any inking. I think that is a first for me, lol.
     See what I mean about the layers? I even used a rose/pinkish color for around the eye. I did want to mention that the gate is cut from a piece of 6" x 6" wood like paper that Erica had sent me. I love those goodies she sends, it's like Christmas morning, lol. I do love to use my cuttlebug embossing folders to add a dimensional background. All you have to do then is add a little ink.
     I also have a cuttlebug die label set by Provo Craft so I made a sign to hang off the fence by using some twine from the Twinery. You can get these supplies in Erica's Store where she always has the greatest prices and a wide variety of products.
     It is hard to tell from this picture and I am a little backwards here but my base card is 4.25" wide by 5.50" tall in order for the pheasant to fit. I guess I am just too excited to show you my next 3 projects which I am sooo happy to share with you. Here ya go......
     Hair accessories! I bought an i-Top a long time ago and had yet to use it. I also had got these hair bands on sale @ Michael's in the clearance section and decided this was a perfect time to think outside the box and come up with something for them and, of course, use my Cricut! I started by making some crocheted flowers 
and then set about to make the brads as my flower "centers".
     If you have been following me then you know how much I love the CCR and my Imagine. I do have a gypsy and the CDS but some how I just feel quite comfortable with the CCR. The first thing I did was to pick a shape to work with. I used a flower shape from Accent Essentials at 2.25" in the blackout feature. Basically any flower shape will do as long as it has multiple petals so the extra fabric will tuck into the brad cover. Next you want to add another mat (layer) but keep your flower in the preview ( this will help to guide you as to the size and placement of your image). For this kitty image I used Best Friends Imagine cartridge on page 17. I used a printable fabric transfer paper as my base. I used the one by Avery.
     In the Imagine, I used each layer separately so I could use print only for the image layer then did the "flower" layer on cut only mode. The Imagine will print first and then unload the mat since you are doing them singularly. Reload the mat and cut the "flower". 
     I used the screw in brads since that is what the hair bands required but there are ones to make brads or buttons. Are you ready to see some more? How about alligator clips with cupcake brads???
     I like the sise of these crocheted flowers better and they go awesome with the cupcake brads. I did these the same way with the CCR and Imagine but this time I used the Better Together Imagine Cartridge.The cupcake is on page 5. Again I used the flower (for the base) this time @ 2" and the cupcake @ .75".
     When I print these I use the best quality. The image still looks some what lighter on the transfer fabric and I wasn't sure if it would hold up. That is why I applied 2 coats of Mod Podge gloss. By doing this the fabric seems to be softer and easier to work with plus I hope it makes it more water resistant. These are my grand daughter Mia's favorite! And lastly........
     I did the same technique but this time I used the crown from Teresa Collins Baby Boutique cart. These were sized the same as the cupcake. You can also add these to clips or any hair accessory.
     Sorry for such a long post but I would love for you to try these. They would make a great gift to have on hand or you could whip up a bunch as early Christmas/Chanukah or birthday presents.
     Be sure to check out Erica's Shop. She always has great prices and you can find all the carts I used for these projects there.
     Now it's time to head over to the lovely Lisa's and see what she is showcasing today. If you get lost along the way here is the line for today:

October hop line up


SATURDAY


  1. MCCR http://mycricutcraftroom.blogspot.com/
  2. Kathy http://3spoileddogs.blogspot.com  
  3. Shelley http://shelley-scrapbookingforfun.blogspot.com 
  4. Claire http://threewaterscreations.blogspot.com
  5. Mary http://Mary-fortheloveofart.blogspot.com 
  6. Lisa Chamberlain http://lisacustomscrapbooking.blogspot.com 
  7. Nadja http://nadjarobbins.blogspot.com  
  8. Janet http://janetscreativeworld.blogspot.com 
  9. Jenn Lorist   http://www.jennspapercrafts.blogspot.com
  10. Erica's Projects http://ericasprojects.blogspot.com/
  11. Angie http://crazyscraplady-angelpie.blogspot.com
  12. Heather http://heathernovinger.blogspot.com  
  13. Robin http://create-a-latte.blogspot.com/ 
  14. Teresa http://www.createenjoyshare.blogspot.com  
  15. Tammy http://www.Cuttinandstampin.blogspot.com    
  16. Cathy http://cathyplus5.blogspot.com
  17. Lisa carrier  http://ourcraftingcorner.blogspot.com 
  18. Jessica S http://jessicascraftshaque.blogspot.com 
  19. Blog Candy http://ericasblogcandy.blogspot.com/