Showing posts with label birthday. Show all posts

Sunday, December 8, 2013

Those December Birthdays


Pinque Peacock
♥ ♥ ♥ WELCOME PRETTY LITTLE PEACOCKS ♥ ♥ ♥
Make sure to become a Follower
then Stop by the 300 Follower Giveaway
TO ENTER TODAY
                                                                   ♥ ♥ ♥ ♥ ♥ ♥ ♥ ♥


      How are all you Pinquettes doing this Holiday season? Is your shopping done? Have you started decorating yet? How about all that baking? Okay who has made at least made their their Christmas cards? Boy this can be such a stressful time especially if you through in 6 (yes I said 6!!!!) Birthdays into the mix. We have 2 grandsons who turn 7 with only 6 days between them, a grand daughter who turns 4 right after Christmas, 2 sons with birthdays on the 19th and 22nd and my son's girl friend on the 31st. It sure can get overwhelming to say the least.
     Last time we met I showed you a tag I made as a Thank you for Thanksgiving. I decided that since the boys really don't care about cards I would do the same thing (they usually rip the envelopes off anyways, lol). So here is what I came up with:


     Quick and easy! I really try to stay away from the Christmas colors and go with a winter theme so they can feel like their Birthday is a special day and not just lost in the season. Nick's is the first of the celebrations starting Dec. 7. I created this tag pretty much like the  Thank You tag I did HERE. This time I used the wonderful Snowman swirl fabric flower.

     I have been making these Snowman Soup packets for several years now. I found all the info online line. You can find the Headers HERE There are several different free printables of these headers just be sure to scroll down.


          Ben's is on December 13th and I am making these hot chocolate bags as favors for the kids at the party. Of course I will send one to Nick in Florida!!!! I love these fabric covered buttons. They are not only so versatile for so many projects but practical as well. I stapled the header to the bag but wanted to cover it so I used a button as camouflage!

Here is the recipe for the "soup":


Ingredients
  • 1 individual packet hot chocolate mix
  • 2-3 chocolate kiss candies
  • 10-15 mini-marshmallows
  • small candy cane
  • treat bag or zipper food storage bag
  • plastic wrap or small zipper storage bag
Instructions
Place mini-marshmallows in small zipper storage bag, or wrap in plastic wrap.
Tuck hot chocolate packet into treat bag. Add marshmallows, chocolate kiss candies, and candy cane.
Seal bag or close with twist tie. Holiday hint: glitzy chenille stems make pretty, decorative bag closures. Curl stem ends around a finger or a wooden spoon to create a curly closure!
Add a printable gift tag or bag topper, or attach hand-written tag using the Snowman Soup poem below.
Snowman Soup
Was told you've been real good this year.
Always glad to hear it!
With freezing weather drawing near,
You'll need to warm the spirit.
So here's a little Snowman Soup
Complete with stirring stick.
Add hot water, sip it slow.
It's sure to do the trick!

     You really have to shop at the Pinque Peacock and check out all the great products there and if you don't see what you are looking for just ask. Jess is great to work with.


Hey, did you know you can custom order with our FABRIC OPTIONS???...
but thats not all custom order you Stick Pins with the BEAD BUFFET...
you can even chose beads for you own personal use!!!


Did you know you can also
purchase Gift Certificates from the shop???
Get one for that hard to buy for crafter!!

Sunday, May 19, 2013

Down The Memory Lane Celebration

   Pinque Peacock
Hello Everyone!


As you all know Down the Memory lane is celebrating its 1st birthday and showcasing artists from different walks of the world and their unique projects.

Here's presenting another artist in the list ,the immensely talented Mary". 

Thanks a lot for being a part of Artist's week.

Keep your eyes open for a creative extravaganza from 15-30th MAY...
     When Nupur asked if anyone would like to help her celebrate I jumped at the chance. Her work is so incredible and who wouldn't like to help her celebrate her first year of blogging? As a fellow Pinquette I also thought it was a great way to use some fabulous Pinque Peacock products. So, I decided what better way to help you see some great flowers, help Nupur celebrate and finish a layout of one of my grand daughters? I call that "winning"!!!!
     
      I am so excited to be able to help Nupur Patel celebrate her 1st birthday in the world of blogs. Her blog: Down The Memory Lane, can be found HERE . There have been some wonderful projects so far from some very talented artists, literally from around the world! You read that correctly since this hop origins in India where you can find Nupur and her equally talented family. Don't you just love the internet? 
     So I wanted to join this celebration not only to help Nupur celebrate, but, also to push me to get some projects done. I decided it was time to scrap the Thank You card we received from my grand daughter over a year and a half ago. (Ok, so I am a slow scrapper, what can I say, lol). I also had some wonderful Pinque Peacock swirl flowers I had custom ordered and boy did they just make this layout! Let's take a look:
     Mia is the prime example of a "girlie" girl. For her 5th birthday we had a baking party. I made over 25 aprons for both boys and girls. Each of the kids donned their aprons and set about decorating cookies, cupcakes etc. I have to explain that this was the end of August when we should have had beautiful weather. Instead, we had a tropical storm, the remnants of a Hurricane so the rain was torrential ! We did get through the party and safely home before the power went out, for days...... This theme party was perfect since all activities were indoors.
     As usual, I digress, lol! I decided to journal around the black background to give a few details about the party. This added to bringing out the stitching on the black ribbon. I also embossed the filigree design on the bottom and went over the raised design with a white gel pen. I wanted to break it up a bit so I added a ribbon with a pink border and white polka dots on the black background.
     Since Mia loves to bake, I used some mulberry heart dies I had and added a small heart pearl to the center.
     I must admit that I save a lot of things, including this bow. It had been from a gift I received and I just thought this ribbon would come in handy some day and, it did. The beautiful pink, silver and black swirl flower is from Pinque Peacock which has wonderful flower embellishments.
     I had special ordered these from Jessica @ Pinque Peacock's Shop and they were perfect for this layout. That is the great thing about this shop. Jess is so easy to work with and always can custom order exactly what you need. You can get some great embellishments for yourself @ the shop HERE. 

          I had the leaves hanging around for a long time and spritz them with a white sparkle. The other black and white flowers are also from my stash. Below is a picture of the lower corner:

     Well that's it for now. I hope you will follow Nupur both on her blog and on her FB page HERE

join in for more fun.....:D
Down the Memory Lane's 1st Birthday celebration!! YAaaaaaaaaaaY!!
and here rolls in 500 FB likes and 100 blog followers giveaway...


Photo: Down the Memory Lane's 1st Birthday celebration!! YAaaaaaaaaaaY!! 
and here rolls in 500 FB likes and 100 blog followers giveaway...:D

To be eligible:

All you have to do is follow these simple steps and you have got yourself won this gorgeous "Goodie" that everyone would want to lay their hands on! 

1. LIKE our fb page 
2. Become a FOLLOWER of our blog
(http://downthememorylane9008.blogspot.in/)
3. FLAUNT the image below , in your blog side bar, Linking it back our blog, as well as share on your fb page 
(post setting - Public)
4. LIKE, COMMENT & SHARE our everyday's posts too..


So what are you WAITING for...
GET SET GOO…..


*open for INTERNATIONAL participants too...
*the WINNER will be picked randomly by the "random winner generator"

http://downthememorylane9008.blogspot.in/2013/05/down-memory-lanes-1st-birthday.html

To be eligible:

All you have to do is follow these simple steps and you have got yourself won this gorgeous "Goodie" that everyone would want to lay their hands on!

1. LIKE our fb page
2. Become a FOLLOWER of our blog
(http://downthememorylane9008.blogspot.in/)
3. FLAUNT the image below , in your blog side bar, Linking it back our blog, as well as share on your fb page
(post setting - Public)
4. LIKE, COMMENT & SHARE our everyday's posts too..


So what are you WAITING for...
GET SET GOO…..


*open for INTERNATIONAL participants too...
*the WINNER will be picked randomly by the "random winner generator"

http://downthememorylane9008.blogspot.in/2013/05/down-memory-lanes-1st-birthday.html


Thursday, November 29, 2012

Those December Birthdays!


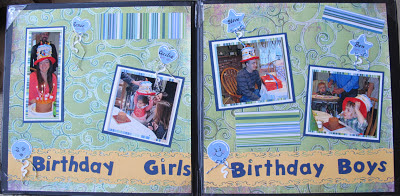
     Wow can you believe it is 1 day away from December? Yikes! I don't know where the year has gone. As the sign says there are only 25 more days left to craft!!!! Today Erica @ My Cricut Craft Room  gave us the choice to do Christmas/ Birthday lists. I chose to do a Birthday layout since December is a HUGE Birthday month for us. My 2 sons were born 15 years and 4 days apart. They are such blessings in our lives. The oldest lives in Florida and will be (gulp!) 39 years old while our youngest will be 24! It was so surreal looking at Nursery schools and Colleges at the same time, lol.
     My layout is from pictures we took last year with my youngest son Steve, his girlfriend Renee, and my grandson Ben and grand daughter Cecilia. I know, I'm slow at getting these done but that's a great thing about being on a DT, it pushes you to get moving! My son Mike (Dec. 22) and his son Nicholas (December 7th birthday) will be here for Christmas this year so hopefully I can do a layout of them this year. Ready for the pics???
     Don't ya just love the hat? This is our traditional birthday hat . I bought it in Disney one Halloween to use as a costume (it just happened to be my birthday so it was entirely appropriate!) This hat has been getting a lot of use in our family. Ok Mary, enough chit chat, they want to hear the details on the lay out. OK!!!
     This is pretty straight forward since I really wanted the pics to show up and definitely wanted to get as far away from red and green colors that I could. As a result I found this great green paper with a wonderful blue swirl to it. I cut the font from Mickey's Font @ 1" and glued them to a strip of yellow card stock from my stash after I had used a Fiskar border punch.
     I added  a rhinestone to the title. I also thought a few balloons would be in order so I cut some @ 1.75" from Elmo's Party. The balloons are in a set of 3: circle, star and heart. I decided to use the heart ones for the "Birthday Girl" page. Of course what would be cuter than adding some Peachy Keen Stamps for the features. I used Laffy Taffy for the girls.
     Pink By Design Paper Doll Features for the boys.
     I also added some chalk to the cheeks and a cute twine bow from the Twinery. There always has to be a twinkle in the eye so, I used a Sakura white gel pen that Erica was generous enough to send me. Here are the girls:
     Here are the boys:
     I hope you enjoyed this project. Now be sure to head back over to Erica's and see what the rest of the team has to show you.


Friday, July 6, 2012

Erica's July Blog Hop: Birthday Reminder Book

July's 100 Cricut cartridge blog hop Day ONE

My Cricut Craft Room 100 Cartridge Hop
     
     Welcome to Erica's 100 cart Blog Hop! Here, each month, the DT showcases 100 different Cricut cartridges. We hope to inspire you and to take another look at the cartridges you already have or to peak your interest on one you may not yet own.  If you have come from Sarah's then you are in the right place If not then you want to start at the beginning so you don't miss a thing! Here's the line up in case you get lost along the way:


     For my project I used Designers' Calendar and the Imagine cartridges Snapshot Everyday and Yummy. I have a really useful and practical project to share with you, a Birthday Reminder Book. Since we have 5 adult children and their spouses (or girl friend) and 8 grand kids plus 4 wedding anniversaries, it can be hard to keep everything straight. That's not to mention the fact that that our oldest son and his family are in Florida and one of our daughters and her husband are relocating to California after 3 years in Hawaii. So let's get right to the details.
     Isn't this just the perfect size? It only measures 2.5" x 4.5" so it is perfect to slip in your pocketbook. First I started with some pieces of chip board. the cover is the balloon paper from Snapshot Everyday on page 3. I used the Imagine shape 3x5 that is built into the Imagine machine and print and cut a totally of 4 pieces. I used 2 for the outside covers and 2 for the inside. After I adhered them to the chipboard, used the Round it All by Zutter to round the outer corners and punched the binding with my Bind It all machine. You can find these great tools at Erica's Store. She has great prices and I have given you the direct link to the Zutter page but please take a few moments to do some shopping while you are there for some of the wonderful crafting supplies Erica carries. Oops, I digress, lol.
     After the cover was all dry I decided to ink the edges and much to my chagrin, I had some ink splotch where I really did not want it to go. No problem. You see the spotted balloon? I gave it a touch of Avocado liquid Pearls to cover the mistake. I decided to do it on the back cover as well so it looks like it was intentional! 
     I didn't want to use a cupcake since this is really for all sorts of celebrations so I used the present from the Imagine cart Yummy.This image is found on page 19 and I cut it at 2". I kept all the layers combined for this project.I inked the edges with Distress ink Worn Lipstick and added some smooch to the flourish on the present and more Liquid Pearls on the bow. Will you just look at all those envelopes, lol. I found these pkg. of mini envelopes at Michaels and they are just perfect for this project. Hmm, I wonder what is inside?
     I started by cutting the flaps off the envelopes and used a circle punch to cut out a little tab.The months were made by using Designers Calendar. I started with black card stock and the boxed feature. All were sized @ 1.25". This is a fabulous way to use all those small scraps of left over paper. I just glued the boxed month on scraps of colors and then cut them down by hand. It is best to punch your holes first so you can center the words correctly.
     I love using the CCR and my imagine together it makes a project go so much quicker. first i used a tag from Art Philosophy @ 3.25". Still in CCR, I added another mat and added the names of the months sized @ .75". This way when you go to print and cut, I use the separate layers option and print the months first, then cut the tags. I did want a lined area to write the dates in so I used George and Basic Shapes to cut a rectangle @ 2.75". The rectangle I used is on page 112 rectangle of the handbook. Boy did I use a lot of scraps on this project just look at the different tags, lol!
     After adding an eyelet to each tag I went through my stash of ribbons and brads to finish them all off. Here is a sample of a few of them:
     I hope you have enjoyed my little project. I plan on making more of these for Christmas presents to go along with the card boxes I am making. Be sure to leave a comment on each of the blogs in the hop this week end for a chance to win some goodies. Did I say goodies? How about I give away some blog candy? I will be giving one lucky follower a set of Pink By Design Stamps "All In The Family". This is a "Pay It Forward" I received from Erica. I was sent this extra set by mistake but asked  Erica if she would mind if I gave it away. Of course she said yes, lol.

     Next stop along the hop is Pattie http://www.sweetpsscrapbooks.blogspot.com/ be sure to hop over and see what she has created just for you.


Sunday, May 20, 2012

A Remote Birthday

                   It's another creative day @ My Cricut Craft Room. I hope you are all enjoying this wonderful spring time weather. Today we could either use our Imagine machines or the Letter U. I used the Imagine cart JT to create the background paper on this card.
     I don't know about you but my husband is always walking around with a tv remote in his hand. He doesn't so much watch a single program in its entirety but rather surfs from station to station. (Swamp people, Pawn Brokers, History Channel, Discovery Channel in addition to House Hunters, Cooking Shows and endless sports commentaries, lol). I swear he has attention deficit since nothing holds his attention for too long. But, I digress. Here are the details on my card:
     As I said I used my JT cart to create the background. This went perfectly with my remote. You can find this pattern paper on page 42. I selected a square 3 3/4" x 5" and flood filled the rectangle with the pattern. I backed it with red card stock and rounded the corners on both before I adhered them together. 
     I noticed that CCR is coming out with a similar remote but I made mine with the Fathers' Day cart and cut it @ 4" and all layers. I used a silver, cream and dark gray card stock to cut my various layers. I wanted to make this as realistic as possible so I had to hand write in the "vol.", "Ch" "DVR" and #'s. As luck would have it, Erica had sent me some "goodies" that included Sakura Black and White Glaze pens and they were perfect for writing on this glossy surface. Erica is great like that. She is always sending us free "stuff" to play with. It's almost like getting crafty products for Christmas, lol.
     I needed to add some buttons to the remote (if there are no buttons to push then he wouldn't have any fun!). I used some liquid pearls in Key Lime and Ruby Red for the stop and go buttons. I even added some Candi (faux brads) in gold, red and green.
     The stamp is from Pink By Design "age is only a #" and I used black embossing powder to add some texture. I also cut a small rectangle in red and wrapped it with some black and white twine from the Twinery again for a pop of color and to add some more texture.
     The finally step was to add a Wobble to the back of the remote. Hey he needs to have some action!!!      All of the supplies to make this card are available in Erica's Store .  It's  true: the liquid pearls, Candi, twine, stamps, embossing powder, card stock and Provo Craft Cricut cartridges are all in there.She is having a fabulous sale for the month of May. I would love for you to stop by and tell her Mary inspired you to shop there.

Please use the code 33 for 33% off your orderworks on everything not already marked down except Cricut and Cuttlebug products.


     Be sure to pop back over to Erica's Blog and see what the rest of the Design Team create just for you.
Until next week, Hugs to all of you~Mary

Sunday, May 13, 2012

Kimono Birthday Card

     Happy Monday morning! I hope you all had a wonderful Mothers' Day. Mine was quiet and subdued which is wonderful. I am a floral designer and next to Valentines' Day, Mothers' Day is our next busiest holiday so I am always glad to sleep in and have a lazy day.
     If you are familiar with My Cricut Craft Room, then you know we get to strut our stuff with either a Letter of the week, our Imagine or the online FREE CCR by Provo Craft. Today I am going to show you one of the CCR digital carts that are for purchase @ cricut.com. I used the Chinese Letters.

       The thumbnail  highlights the Chinese Letter that symbolizes "Friend". The fan is from Ashlyn's Alphabet on page 54 and was cut @ 1.5", I highlighted it with gold stickles and added some red pearls on the holes on the fan. The "friend" was cut both shadow and symbol @ 1.25".
     Are you ready to see what I did with the fan and Letter? 
     I made a card of course, lol! I used a 5"x7" card for the base. The Kimono is from Pagoda and was cut @ 2.83 x 3.50 with both image and shift keys. You can find this on page 73. I love texture so I used the cuttlebug folder of chinese lanterns to kind of tie this card's theme together.I also used a stamp of a lantern that I had. The Happy Birthday is another rub on that I had. A few rhinestones and this card is all blinged up!!
     If you are looking for any of the products that I used here, you can find them over @ Erica's Shop. She has all sorts of goodies over there and best of all they are on SALE. Thank you Erica!!! Her sale runs the whole month of May so you won't want to miss out.

Please use the code 33 for 33% off your orderworks on everything not already marked down except Cricut and Cuttlebug products.


     Please pop back over to Erica's Blog and see what the rest of the team has to share. I am always amazed at what my fellow DT members create.


Sunday, April 8, 2012

Make A Splash Card


Welcome back my friends. I hope you all had a wonderful week end. I certainly did with 6 of our grand children hunting for and coloring eggs!
Today over at Erica's Craft Room the Design Team uses either the Cricut Imagine, CCR digital designs or the carts for the E2. I am going to show a great card created using the Imagine cart Greeting Cards Inside and Out.
You are seeing this correctly it is a surf board shaped card. The image is found on page 6 and I cut it at 5.50". I first cut the card base as shown but, you know me, I LOVE to seperate the layers out,lol. So I also cut 1 top layer, 1 "on your birthday", 1 splash and 2 mermaids.I started to bling up the mermaid with some stickles and of course rhinestones. I adhered the Splash on the top layer and as well as a "plain" mermaid. The blinged up mermaid was then added by using some pop dots. Finally I used a wobble action spring to the back of the surf board so she looks like she is riding a wave!!!! This card is small (only about 2" wide and would be great as a tag on a gift.
This is with the wobble action.

Such a cutie!!!

I thought I'd complete the look by making a matching envelope. This is also on the cart Greeting Cards Inside And Out. You can find this on page 31. In order to fit this card size, I cut it at 7" and it fits perfectly!
You can purchase the Wobbles over at Erica's shop http://www.shop.ericascraftroom.com/.
Now it's time to head back over to My Cricut Craft Room and see what the rest of the Design Team has to show you. Hope you have a wonderful week. Hugs~ Mary

Saturday, December 17, 2011

Ben's Birthday Cake

     The month of December is a REALLY busy one for us.You see not only do we have all the activities of Christmas but we have 6 birthdays. Dec.7, 13, 19, 22, 28 and also the 31st! The ages they are celebrating are 5, 5, 23, 38, 2 and 22. I feel so bad for them because it's almost like the birthday is set aside for Christmas. So with that in mind I have always made sure the presents are wrapped for the right occasion and there is a birthday cake. We have plenty of cookies for Christmas but birthdays deserve a cake!
     We don't get to see Nicholas who turned 5 on December 7 since he is in Florida however we did send his gifts. Poor Benjamin who turned 5 on December 13th FINALLY had a party. You see it usually snows or his third birthday was supposed to be a big party however we were hit with a major ice storm and most of us were without power for 3-5 days. Chuck e Cheese to the rescue for some of us, lol. I believe last year there was also a snow storm. So this year the weather co operated and the party was a blast! (Literally, they did laser tag)!
     I had just gotten the Cricut cake machine in (great deal) so this is my first attempt using this machine. I used the Buccaneer cart since it was a pirate party. I think there is going to be a learning curve!
     I had my own gum paste (tinted brown) for the skull and cross bones. The blue and white is a sugar sheet that I thought would be good to work with, wrong! it dries too quickly and is brittle. Even though I got it on sale, I don't think I'll use this again.
     I was fortunate enough to find some pirate themed candles to add to this. How cool are these banners? I made a lot of them because.....
     I made cupcake boxes for the kids party at the laser tag party so each kid would have their own cake. Ben's was extra special with the "Shiver Me Timbers" pattern for the cart. I made a little insert for the bottom of the wrapper to raise the cupcake up. The insert was cut from Sweet Tooth Boxes. I forget which cart I used for the actual box. Just a word of warning if you print your own cardstock with the Imagine, it is not waterproof. I placed the cupcakes in the wrappers just prior to bringing to the party.
     Here's the handsome and ever playful Benjamin who is now officially 5! I will show you the rest of our birthday bashes as the month goes on. Off to practice with my Cricut Cake!!!!