~~~~ Click HERE for the 300 Blog Follower Giveaway ~~~~
Hello to all of our Pretty Little Peacocks
THE FACEBOOK PAGE FOR SOME PRODUCT SHOWCASES, TOO
Are you Ready to See these products IN ACTION?
!!!!Now, let's talk about the
Hello to all of our Pretty Little Peacocks
Welcome to Pinque Peacock’s
JULY BLOG HOP
We hope you will enjoy your time as you hop and that you feel
♥ ♥ ♥ ♥ ♥
inspired to create after visiting the Talented Pinquettes' Blogs!
This hop will showcase projects that have been created using some of the
wonderful Handmade products that are always available at Pinque Peacock.
We are thrilled to have you joining us this month!
During the hop, you will see some past favorites, oldies but goodies, and get a glimpse of some NEW products as well! Feel free to browse the newly updated shop for amazing deals on tons of craft supplies and great handmade embellishments to use in all of your projects!
Our Monthly Hops are a great way to see the Pinque Peacock Products in action and to get your creative imaginations in "Full Speed Ahead" mode!
♥ ♥ ♥ ♥ ♥
Our JULY HOP will focus on the theme of:
~~**My Favorite Things**~~
The PINQUETTES will share with you their
favorite techniques, items and of course
PINQUE PEACOCK products they like and
enjoy using in their crafting, creating and designing!
♥ ♥ ♥ ♥ ♥
All New Products will be added to the SHOP
for you to Purchase and start creating your very own
Masterpieces!!!
BE SURE TO WATCH
Are you Ready to See these products IN ACTION?
After hopping, we would LOVE for you to visit the
Pinque Peacock Shop and Fan Page on FB to stay connected!
Pinque Peacock Shop and Fan Page on FB to stay connected!
Good morning fellow crafters! Isn't it great to see what everyone shares for their favorite things? I just want to make sure you are on the right track, so, if you came from Kimberly then you are in the right place. I hope you have been inspired by all the projects so far.
Are you ready to see some of my favorite things? First I love altering then embellishments, all kinds! I love lace, flowers, rub-ons, bling and beads, dimension, metal etc. I think you get the idea, lol.
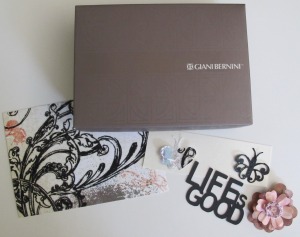
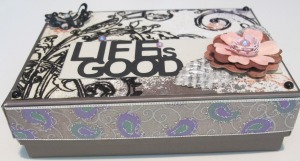
First I started with this beautiful box. One of my daughters bought me an Alex and Ani bracelet for Mothers' Day and presented it in this beautiful yet plain box.
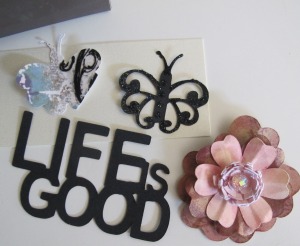
Jessica sent me the most beautiful bag of goodies and so I grabbed some out and started to play. Here are the goodies:
These are from the May release. They are just gorgeous I tell you. I also added a few things from this month's Crafty Kit (more on that later!). You can find these items at the shop listed in the link above. Now let's see what I did with them!
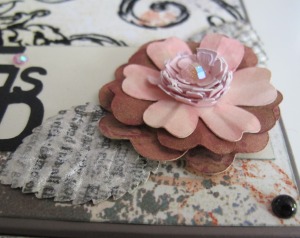
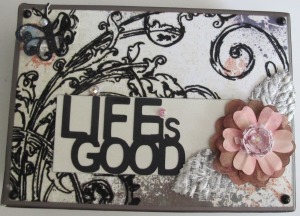
I added some lace from July's Crafty Kit as well as the metal leaf, and pearls. The flower (Nana's pillowcase collection) and the stick pin are from the May release and are still available.
I also wanted to add something to the front so I used Silver foil rub ons that were also in the July Crafty Kit along with a small pearl. This box is the perfect size for little trinkets and I will certainly place it in a place of honor in my craft room!
Now be sure to head over to Rebecca for some fabulous inspiration. I wonder what her favorite things are?
BLOG HOP PRIZE!!!!
One
winner, who has hopped and visited all of the PINQUETTES BLOGS of our
Pinque Peacock MAY Product Release and followed the RULES BELOW will win
A $10 GIFT CERTIFICATE TO THE SHOP
A $10 GIFT CERTIFICATE TO THE SHOP
Here is How*:
1 – Hop to ALL of the stops in the Blog Hop and comment at each Pinquette Blog.
(Lineup is below)
(Lineup is below)
2 – Follow the Pinque Peacock Blog and Facebook Page/Shop
3 – Follow EACH of the Pinquettes’ Personal Blogs who are participating as Hop Stops.
4 - COMMENT at the Facebook Page telling us what you liked most about the Hop
4 - COMMENT at the Facebook Page telling us what you liked most about the Hop
*You MUST do ALL of the steps above
to be included in the random drawing for the prize.
We would hate for you to lose out on winning just because you didn't follow these easy rules :(
to be included in the random drawing for the prize.
We would hate for you to lose out on winning just because you didn't follow these easy rules :(
The Hop will remain open until Wednesday, JULY 16th, at 8:00 a.m. EST.
The random drawing will be held sometime during the week that follows and announced by Wednesday, JULY 23rd.
Now, if you find yourself Hopping off the Path , you can use this
Lineup to get back on the Right Track . . .
COMPLETE LINE-UP::
Lineup to get back on the Right Track . . .
COMPLETE LINE-UP::
Pinque Peacock ~ http://pinquepeacock.blogspot.com
Heather ~ http://www.papercrafteranonymous.com
Julie~ http://muddypawsinkyfingers.blogspot.com
Kimberly ~ http://scrappingrookie.blogspot.com
Mary ~ http://Mary-fortheloveofart.blogspot.com
Rebecca ~ http://bloomingpink.blogspot.com/
Rhonda ~ http://flowersbyrhonda.blogspot.com
Heather ~ http://www.papercrafteranonymous.com
Julie~ http://muddypawsinkyfingers.blogspot.com
Kimberly ~ http://scrappingrookie.blogspot.com
Mary ~ http://Mary-fortheloveofart.blogspot.com
Rebecca ~ http://bloomingpink.blogspot.com/
Rhonda ~ http://flowersbyrhonda.blogspot.com
Thank You for hopping along and we hope you have Loads of Fun!
Peacock Love
and
Crafty Hugs
and
Crafty Hugs
~ Jessica, The Quirky Queen
and
her BELOVED,
TALENTED, &
EXTRAORDINARY Pinquettes
and
her BELOVED,
TALENTED, &
EXTRAORDINARY Pinquettes


