Welcome to Day One of Erica's October 100 cart Blog Hop! If you came from Claire's then you are in the right place. If not then you want to start @ http://mycricutcraftroom.blogspot.com so you don't miss a thing. As you can see we are all dressed in pink for Breast Cancer Awareness. It is so important to have your mammogram done yearly as well as performing monthly self breast examination. Here's hint: schedule your appointment around your birthday that way you don't forget to have it done.

Now let's get down to business. I have some great projects using the following cartridges: Art Nouveau, Best Friends, Better Together and Baby Boutique. I also used Picturesque and Accent Essentials to complete my projects. First up is a card I made with Art Nouveau and Picturesque.
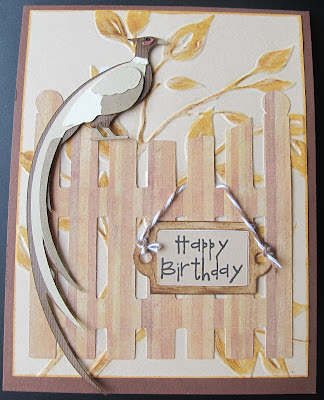
I wanted to make a birthday card for my husband so this is what I came up with. I used the image on page 65 for the pheasant and cut it at 5" including all the layers. The gate is from Picturesque on page 69 and I cut it @ 3 3/4". The layers are so beautiful with these scrap papers that I didn't even have to do any inking. I think that is a first for me, lol.
See what I mean about the layers? I even used a rose/pinkish color for around the eye. I did want to mention that the gate is cut from a piece of 6" x 6" wood like paper that Erica had sent me. I love those goodies she sends, it's like Christmas morning, lol. I do love to use my cuttlebug embossing folders to add a dimensional background. All you have to do then is add a little ink.
I also have a cuttlebug die label set by Provo Craft so I made a sign to hang off the fence by using some twine from the Twinery. You can get these supplies in Erica's Store where she always has the greatest prices and a wide variety of products.
It is hard to tell from this picture and I am a little backwards here but my base card is 4.25" wide by 5.50" tall in order for the pheasant to fit. I guess I am just too excited to show you my next 3 projects which I am sooo happy to share with you. Here ya go......
Hair accessories! I bought an i-Top a long time ago and had yet to use it. I also had got these hair bands on sale @ Michael's in the clearance section and decided this was a perfect time to think outside the box and come up with something for them and, of course, use my Cricut! I started by making some crocheted flowers
and then set about to make the brads as my flower "centers".
If you have been following me then you know how much I love the CCR and my Imagine. I do have a gypsy and the CDS but some how I just feel quite comfortable with the CCR. The first thing I did was to pick a shape to work with. I used a flower shape from Accent Essentials at 2.25" in the blackout feature. Basically any flower shape will do as long as it has multiple petals so the extra fabric will tuck into the brad cover. Next you want to add another mat (layer) but keep your flower in the preview ( this will help to guide you as to the size and placement of your image). For this kitty image I used Best Friends Imagine cartridge on page 17. I used a printable fabric transfer paper as my base. I used the one by Avery.
In the Imagine, I used each layer separately so I could use print only for the image layer then did the "flower" layer on cut only mode. The Imagine will print first and then unload the mat since you are doing them singularly. Reload the mat and cut the "flower".
I used the screw in brads since that is what the hair bands required but there are ones to make brads or buttons. Are you ready to see some more? How about alligator clips with cupcake brads???
I like the sise of these crocheted flowers better and they go awesome with the cupcake brads. I did these the same way with the CCR and Imagine but this time I used the Better Together Imagine Cartridge.The cupcake is on page 5. Again I used the flower (for the base) this time @ 2" and the cupcake @ .75".
When I print these I use the best quality. The image still looks some what lighter on the transfer fabric and I wasn't sure if it would hold up. That is why I applied 2 coats of Mod Podge gloss. By doing this the fabric seems to be softer and easier to work with plus I hope it makes it more water resistant. These are my grand daughter Mia's favorite! And lastly........
I did the same technique but this time I used the crown from Teresa Collins Baby Boutique cart. These were sized the same as the cupcake. You can also add these to clips or any hair accessory.
Sorry for such a long post but I would love for you to try these. They would make a great gift to have on hand or you could whip up a bunch as early Christmas/Chanukah or birthday presents.
Be sure to check out Erica's Shop. She always has great prices and you can find all the carts I used for these projects there.
Now it's time to head over to the lovely Lisa's and see what she is showcasing today. If you get lost along the way here is the line for today:
October hop line up
SATURDAY
- MCCR http://mycricutcraftroom.blogspot.com/
- Kathy http://3spoileddogs.blogspot.com
- Shelley http://shelley-scrapbookingforfun.blogspot.com
- Claire http://threewaterscreations.blogspot.com
- Mary http://Mary-fortheloveofart.blogspot.com
- Lisa Chamberlain http://lisacustomscrapbooking.blogspot.com
- Nadja http://nadjarobbins.blogspot.com
- Janet http://janetscreativeworld.blogspot.com
- Jenn Lorist http://www.jennspapercrafts.blogspot.com
- Erica's Projects http://ericasprojects.blogspot.com/
- Angie http://crazyscraplady-angelpie.blogspot.com
- Heather http://heathernovinger.blogspot.com
- Robin http://create-a-latte.blogspot.com/
- Teresa http://www.createenjoyshare.blogspot.com
- Tammy http://www.Cuttinandstampin.blogspot.com
- Cathy http://cathyplus5.blogspot.com
- Lisa carrier http://ourcraftingcorner.blogspot.com
- Jessica S http://jessicascraftshaque.blogspot.com
- Blog Candy http://ericasblogcandy.blogspot.com/


