Friday, November 30, 2012


     Welcome to My Cricut Craft Room's 100 Cart Blog Hop! If you have come from Erica's Projects then you are in the right place, if not then you want to start at the beginning HERE so you don't miss a thing.. Each month the Design Team shows you projects made using 100 Cricut cartridges. We hope to inspire you to dig out those carts or help you to explore the possibilities on carts you already own. Hey you might even find one to add to your Christmas or Chanukah wish list. As a member of Erica's team, I have chosen to use the following 4 cartridges: Handy Man, Hello Kitty, Very Merry Tags and the Imagine cart Santas' Village.
     December is party month in our house. Next to October it is one of our busiest Birthday months. We have 6 birthdays this month. They are on the 7th, 13th, 19th, 22nd, 28th and 31st. My oldest child will be 39 on the 22nd and I came home from the hospital Christmas Day so it is always a special day for me in more ways than one! So I chose to make 2 Birthday cards as well as 2 Christmas projects for you so let's get started.


     My first project was a birthday card for one of my grand sons who is turning 6. I used Handy Man to make this tape measure and cut all layers @ 1.75".
     
      I used some silver card stock on this which looks awesome in person. I used a black gel pen to mark all the increments on the die cut.
     I used some screw brads for the corners and mounted it on robot paper since he loves Transformers. I finished up with a stamp by Pink By Design called "Tool Time".
     My next birthday card is a snowman shaped card for my grand daughter who turns 3 on Dec. 28th. Wanna see???
     Isn't she cute??? Believe it or not, this snowman was in Hello Kitty. I used my gypsy to weld the image into a shaped card. This was sized @ 5".
     I actually welded 2 snowmen together and cut an extra without welding for the top layer. Of course I had to use cinnamon stickles for a little sparkle!
     Oh yeah, more stickles, some chalk blush and , of course, the wonderful winter stamp by Pink By Design stamps again. I think her hat and scarf came out so adorable with the glittered card stock. Are you ready for my favorite Christmas project this season? Have you ever wondered how Santa comes in if you don't have a chimney? How about a Magic Key?
     I found this key @ Michael's and wanted to do something special with it. I found a wonderful story on the internet.....
     So now I needed to design something to store it in. I had some small plain boxes so I decided to alter it like this:
     I used George Basic shapes and  Santas Village in the CCR to design a circle and then place the image from page 5 in the center of the circle. All I had to do was to use my Imagine, print and cut and Voila a sticker image! I finished it all off by layering some green and red card stock and added some liquid pearls for dimension. I have already sold quite a few!
     My final project is the tags I plan to use on my gifts for the guys this year. I used Very Merry Tags to create these.
     I cut these @ 3". This reindeer is the negative cut from the image. I cut all the solid tags from Kraft card stock and then used the main cut and negative pieces so I get 2 tags from one cut! I added some snow to the bottom of the tag with a snow cap marker by Marvy. Once you heat it, it puffs up!!! I used a glaze marker to add an eye and some stitching around the edge. I finished it off with a small jingle bell.
     Whew, that was a long post. I hope you gained a little inspiration from me today. Now head over to Liz and see what enchanting projects she has designed to thrill you with! Be sure to start at the beginning and leave some blog love for each of our designers. Just in case you get lost along the way, here is the complete line up:
My Cricut Craft Room http://mycricutcraftroom.blogspot.com/
Jen L http://www.mybusycraftylife.blogspot.com/
Shelley http://shelley-scrapbookingforfun.blogspot.com/


Thursday, November 29, 2012

Those December Birthdays!


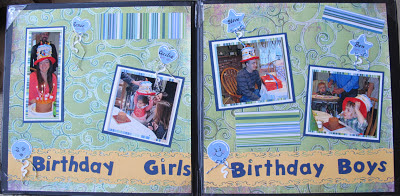
     Wow can you believe it is 1 day away from December? Yikes! I don't know where the year has gone. As the sign says there are only 25 more days left to craft!!!! Today Erica @ My Cricut Craft Room  gave us the choice to do Christmas/ Birthday lists. I chose to do a Birthday layout since December is a HUGE Birthday month for us. My 2 sons were born 15 years and 4 days apart. They are such blessings in our lives. The oldest lives in Florida and will be (gulp!) 39 years old while our youngest will be 24! It was so surreal looking at Nursery schools and Colleges at the same time, lol.
     My layout is from pictures we took last year with my youngest son Steve, his girlfriend Renee, and my grandson Ben and grand daughter Cecilia. I know, I'm slow at getting these done but that's a great thing about being on a DT, it pushes you to get moving! My son Mike (Dec. 22) and his son Nicholas (December 7th birthday) will be here for Christmas this year so hopefully I can do a layout of them this year. Ready for the pics???
     Don't ya just love the hat? This is our traditional birthday hat . I bought it in Disney one Halloween to use as a costume (it just happened to be my birthday so it was entirely appropriate!) This hat has been getting a lot of use in our family. Ok Mary, enough chit chat, they want to hear the details on the lay out. OK!!!
     This is pretty straight forward since I really wanted the pics to show up and definitely wanted to get as far away from red and green colors that I could. As a result I found this great green paper with a wonderful blue swirl to it. I cut the font from Mickey's Font @ 1" and glued them to a strip of yellow card stock from my stash after I had used a Fiskar border punch.
     I added  a rhinestone to the title. I also thought a few balloons would be in order so I cut some @ 1.75" from Elmo's Party. The balloons are in a set of 3: circle, star and heart. I decided to use the heart ones for the "Birthday Girl" page. Of course what would be cuter than adding some Peachy Keen Stamps for the features. I used Laffy Taffy for the girls.
     Pink By Design Paper Doll Features for the boys.
     I also added some chalk to the cheeks and a cute twine bow from the Twinery. There always has to be a twinkle in the eye so, I used a Sakura white gel pen that Erica was generous enough to send me. Here are the girls:
     Here are the boys:
     I hope you enjoyed this project. Now be sure to head back over to Erica's and see what the rest of the team has to show you.


Monday, November 26, 2012

Day 4 12 Days Of Christmas Blog Hop

Welcome to Day 4 of the 12 Days Of Christmas Blog Hop


Welcome to the 12 Days of Christmas Blog Hop Day 4.This hop will take place November 24th through December 5th and the new postings each day will be posted by 9am eastern standard time. This hop will be full of wonderful ideas and inspiration to get you well on your way of creating all of those beautiful Christmas project. This is an awesome way to get a lot of your Christmas cards, and scrapbook layouts finished, home decorations completed and maybe even be inspired to create something using a new technique that you have never tried.  There will be a new project posted each and every day by all the wonderful amazing ladies in this hop. Also each day we will have a guest designer or two for you to visit. They will be giving away some wonderful blog candy each day of the hop from our amazing sponsors that we have for this hop. I will be posting all the winners from this hop on December 9th. Every one has a chance to win including the ladies participating in the hop and even the guest designers and the sponsors.
     If you just came from the super talented Suzy's Crafts then you are in the right place.If not then you want to start in the beginning Here.
      I am so excited to be showing you my project today as a guest designer. I love decorating for Christmas so I jumped at the chance to join this extremely talented group of crafters. For my project I chose to add a little welcome greeting for our family and friends as they enter our home. My stairs in the entry way need a good paint touch up but we decided to wait til after the holidays so I spruced them up with a little vinyl  art. The original idea I found on Pinterest but decided to add my own twist and put them on the risers for the stairs instead of the wall.
     As you can see I used all different fonts from my various Cricut carts. I realized I hadn't quite sized the "peace" and "Christmas" porportionately enough to keep the shape of the tree but not to worry. I used a flourish from CTMH Art Philosophy and made these @ 2",3"4", 5" and 6" so now it looks like a tree. I also added a piece of brown vinyl for the trunk.
     I hope you have gained some inspiration in my project and give it a try. Now be sure to visit the talented Ashley since she has been showing some fabulous projects.