Showing posts with label green. Show all posts

Thursday, August 9, 2012

Princess Pixie

     Good morning to you all! I hope you are enjoying the remainder of the summer. Boy has it been humid!!! Today I am going to share another Copic project with you. The adorable digi stamp was a freebie bee from Pixie Dust Studios and I finally got a chance to color her. I have also included all the markers I used to color her. Are you ready???? Here she is:
     Isn't she just the cutest little fairy with that pixie face? I started with the scraps of paper that were hanging around on my craft table and used my Copic chart to match my marker colors. Boy that really made the coloring go fast!!!
     This close up will give your a better idea. Here are the colors I used and the order in which I colored the image:
Face: E000,E00,E01,BV00, R20
Eyes: BG0000,BG02,BG05,BG07,W1,W3,W7
Hair: E25,E29,E31
Dress: YG17,YG21,YG25
Wings: V12,V15,V19,BV25
Mouth: R20,R22,R24
Mushroom-cap: E50,E53,E57
   -underneath and stem: E13,E15,E18
   -dots- YR01, YR02,YR07
Bird body: B21,B24,B26,Y15,Y17
Crown: Y00,Y04,Y06
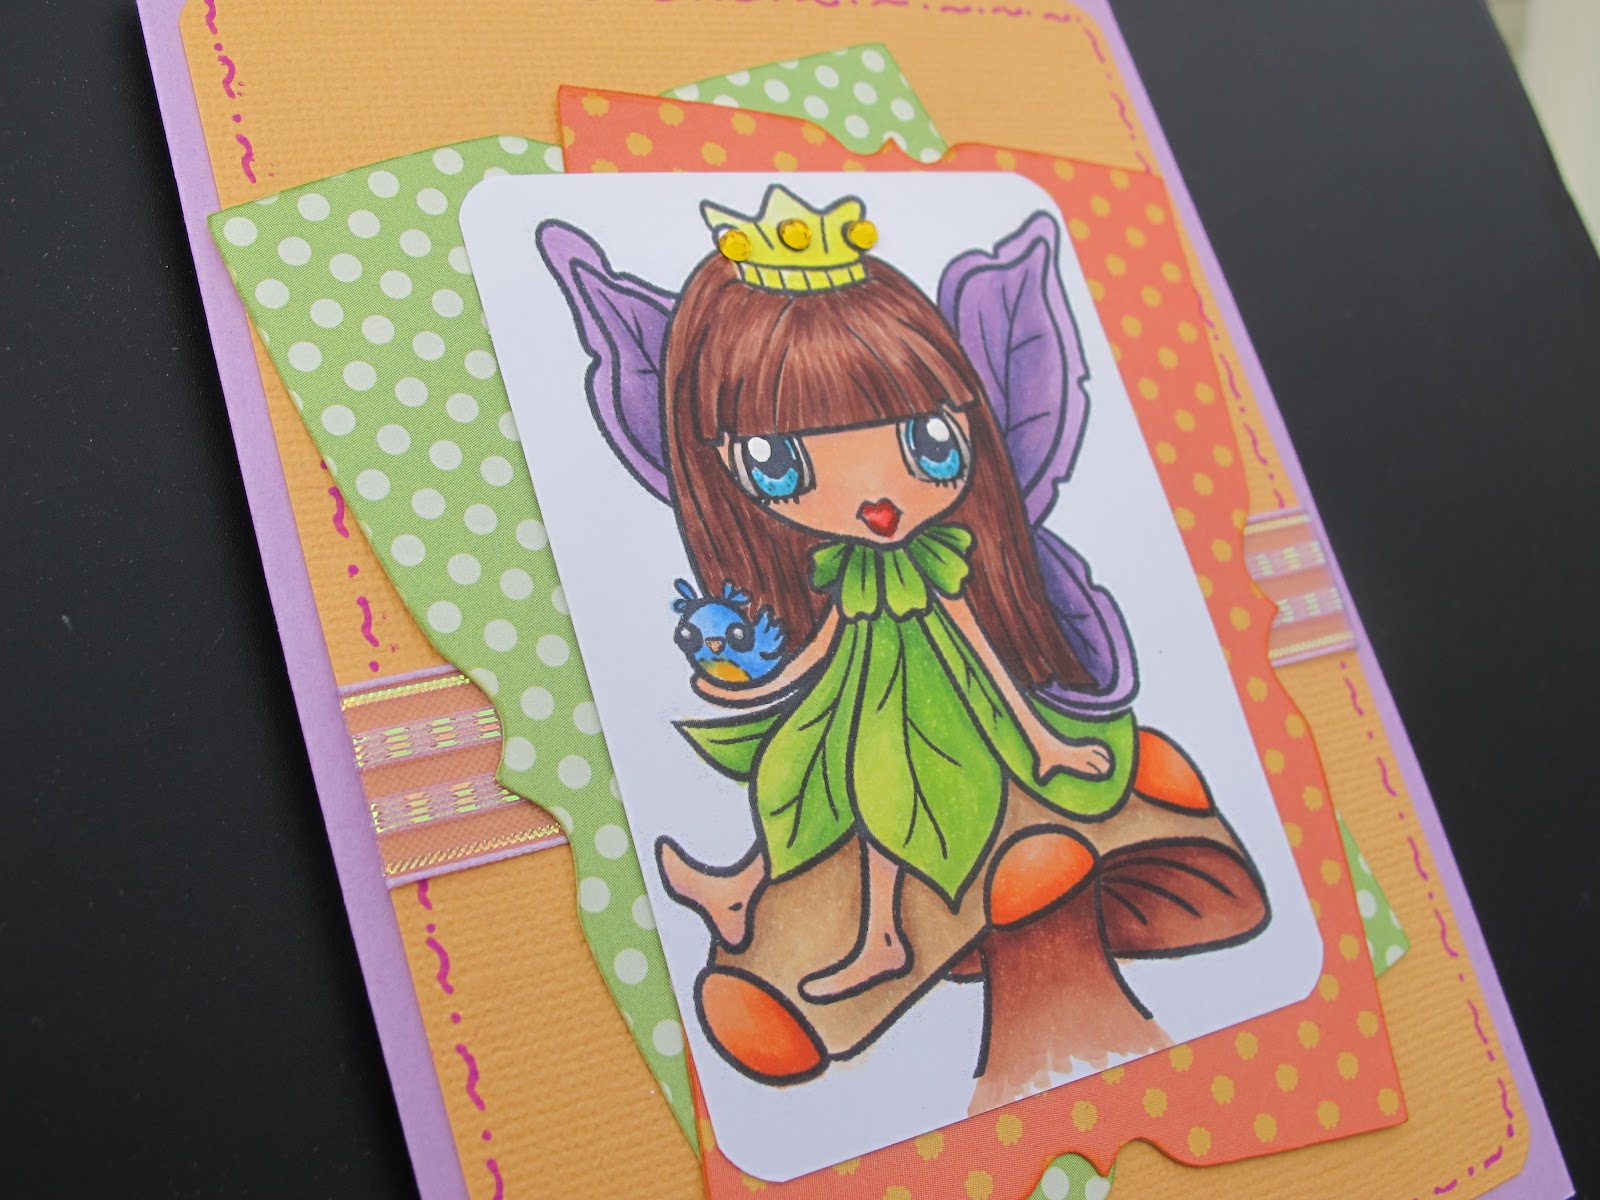
     I used the image from the Storybook cartridge by Provo Craft for the shaped pieces in the background. This can be found on page 67 of the hand book. A little doodling around the edge, some sparkly ribbon and of course some bling on the crown and she is done. I haven't decided on a sentiment yet but had so much fun coloring her.
     I hope you enjoy my creation and have a wonderful day.


Sunday, December 4, 2011

Ornament Boxes

Christmas Ornament Boxes

     Well have I ever been busy, lol. Along with trying to do Christmas shopping, filling ornament orders and doing Birthday shopping/baking, I haven't forgot I had promised to show you the packaging my ornaments come in.
     First I ordered some clears boxes from www.clearbags.com. These turned out to be the perfect size but, they needed something to hold the ornament in place. I hope you realize by now that there isn't anything you can't do with a Cricut! I used the Sweet Tooth Boxes cart and used a cupcake holder cut at 6.75. The patterned paper was done using Santas Village cart and I even made a matching tag. I just love how the Imagine can resize the images to the appropriate size object so everything is proportionate! One thing if you plan on making these is to use a sturdy cardstock for the base.
     We have 6 December birthday's (ughhh!) so I finally bought a Cricut Cake to kind of help me out yet I haven't had a chance to play yet. This week I have to dive in so I'll post pics on how I do, wish me luck!!!
     Also Tim Holtz is in full swing with his 12 tags of Christmas and can I just say WOW! I hope to complete a few and I'll definitely share these gems as soon as I finish. I think it's going to be a creative week!!!

Saturday, November 5, 2011

Chalk Holder

     With the holidays coming I thought I'd make a few teacher gifts. A while back I bought these chalk painted flower pots and decided it was time I did something with them. They were a clearance item from Pottery Barn so I boght a few. I have one that holds my cricut markers but thought they would make a perfect holder for chalk to give to a teacher.
     I cut the images of both a girl and boy in vinyl from A Childs' Year cartridge. The shadow layer is in white whereas the top layer is in red. I also cut the image a third time out of card stock but cut the "apple" part off so I just had the leaves to work with.
     The bottom was sort of plain so I added a simple white picot ribbon and a few clear rhinestones. Add a box of chalk and you have a simple teachers gift! I do have a few for sale in my etsy shop. By the way, the snow is 5 days since our historic October snow storm. Maybe I'll get a lot of crafting done this winter.

Tuesday, October 25, 2011

Nativity Card

     This is one of the religious cards I made for this upcoming Christmas season. I just love the simplicity of it. The green cardstock has a nice sheen to it as well as the cream background. I decided to emboss the cream card stock with the swiss dots cuttlebug folder to add a little texture to the card. (I love texture!)
     The Nativity image is from Cricut "Inspired Heart" cartridge. This cart is amazing! I also made another Christmas card from this cart but I'll have to show you when it's finished (it's still a work in progress, lol).The cartridge has some great cuts especially for sympathy. I have a lot of ideas for those.
     I also added a gold card stock star but can't remember which cart I cut that one from. (guess I'm going senile!). I wanted a somewhat primitive look so that's why I chose the brown background paper but it needed to be dressed up a bit. I happen to have a lot of this textured ribbon so it just finished it off nicely.
     I have been adding sentiment inside some of my cards lately and found this one in a book i recently purchased.Say It With Style is a great book of quotes and it is great for card makers. I bought mine through Annies Attic. Hope you like this latest offering. I have some new photo emulsion I am trying on my Yudu Cardmaker screens. I am getting ready for when my Word Collage cart arrives because I have big plans for this cartridge, lol.