Showing posts with label rhinestones. Show all posts

Sunday, May 11, 2014

Invitation Layout

~~~~ Click HERE for the 300 Blog Follower Giveaway ~~~~

Hello to all of our Pretty Little Peacocks
Welcome to Pinque Peacock’s
MAY BLOG HOP


♥ ♥ ♥ ♥ ♥

We hope you will enjoy your time as you hop and that you feel

inspired to create after visiting the Talented Pinquettes' Blogs!

This hop will showcase projects that have been created using some of the

wonderful Handmade Flower products that are always available at Pinque Peacock.


We are thrilled to have you joining us this month!

During the hop, you will see some past favorites, oldies but goodies, and get a glimpse of some NEW products as well! Feel free to browse the newly updated shop for amazing deals on tons of craft supplies and great handmade embellishments to use in all of your projects!

Our Monthly Hops are a great way to see the Pinque Peacock Products in action and to get your creative imaginations in "Full Speed Ahead" mode!


Our MAY Release will focus on the theme of:
~~**FLOWERS**~~
♥ ♥ ♥ ♥ ♥

All New Products will be added to the SHOP
for you to Purchase and start creating your very own
Masterpieces!!!

BE SURE TO WATCH
THE FACEBOOK PAGEFOR SOME PRODUCT SHOWCASES, TOO
Are you Ready to See these products IN ACTION?

After hopping, we would LOVE for you to visit the
Pinque Peacock Shop and Fan Page on FB to stay connected!
  
     Good morning and Happy Mothers' Day my pretty Peacock's!  Pinquette Mary here hoping you are all enjoying your special day whether you are a Mother yourself, spending time with your Mom or having fond memories of your Mom in Heaven, either way I hope you have something special planned. Speaking of special, oh my goodness what great projects on this hop. If you just came from Kimberly then you are in the right place! Today I wanted to share with you an with a easy way to preserve those beautiful invitations you receive without ruining them and of course dress it up with beautiful Pinque Peacock supplies.


     I knew as soon as Jessica showed us the new products for the hop that Nana's Pillowcase would be my favorite and it is. The colors matched my grand daughters invitation perfectly and includes all the colors. Since chalkboard art is so popular now, my daughter used this invitation to the First Communion. Bold and yet soft enough for the occasion.
     In order to preserve all the info that was also included on the back of the card I decided to add a band of card stock, dress it up and tack it down on either side with flower brads. This way I could always remove it without damaging the card.

     I just love how soft this flower is and I couldn't believe how perfectly it goes with the card stock I had on hand. I also had some "spare" leaves hanging around and added some lace and this epoxy frame to really draw attention to the fabric Splendid Swirls flower. You can purchase them HERE
     Lastly, I needed something to balance off the lower right hand corner so I used a piece of lace for consistancy and I had an embellishment in the Mind's Eye stack I had but it needed something. Of course sparkle...bling... rhinestones... and...Stickles!!

     
     So there you have it a simple yet elegant way to save this wonderful card. It will be fun to look at this in later years. Be sure to hop on over to the ever talented Rebecca and be prepared to be inspired!

!!!!Now, let's talk about the
BLOG HOP PRIZE!!!!
One winner, who has hopped and visited all of the PINQUETTES BLOGS of our Pinque Peacock MAY Product Release and followed the RULES BELOW will win

A $10 GIFT CERTIFICATE TO THE SHOP


Here is How*:

1 – Hop to ALL of the stops in the Blog Hop and comment at each Pinquette Blog.
(Lineup is below)


3 – Follow EACH of the Pinquettes’ Personal Blogs who are participating as Hop Stops.

4 - COMMENT at the Facebook Page telling us what you liked most about the Hop

*You MUST do ALL of the steps above
to be included in the random drawing for the prize.
We would hate for you to lose out on winning just because you didn't follow these easy rules :(

The Hop will remain open until Wednesday, MAY 14th, at 8:00 a.m. EST.
The random drawing will be held sometime during the week that follows and announced by Wednesday, MAY 21st.

Now, if you find yourself Hopping off the Path , you can use this
Lineup to get back on the Right Track . . .

COMPLETE LINE-UP::
Pinque Peacock ~ http://pinquepeacock.blogspot.com
An’Jenic ~ http://anjenicgibson.blogspot.com
Heather ~ http://www.papercrafteranonymous.com
Julie~ http://muddypawsinkyfingers.blogspot.com
Kimberly ~ http://scrappingrookie.blogspot.com
Mary ~ http://Mary-fortheloveofart.blogspot.com
Rebecca ~ http://bloomingpink.blogspot.com/
Rhonda ~ http://flowersbyrhonda.blogspot.com
Shelley ~ http://shelley-scrapbookingforfun.blogspot.com/

Thank You for hopping along and we hope you have Loads of Fun!
Peacock Love
and
Crafty Hugs
~ Jessica, The Quirky Queen
and
her BELOVED,
TALENTED, &
EXTRAORDINARY Pinquettes
~ ~ ~ ~ ~ ~ ~ ~ ~ ~ ~ ~ ~
Saturday, April 19, 2014

Mia's First Communion Card


Pinque Peacock♥ ♥ ♥ WELCOME PRETTY LITTLE PEACOCKS ♥ ♥ ♥
Make sure to become a Follower
then Stop by the 300 Follower Giveaway TO ENTER TODAY

♥ ♥ ♥ ♥ ♥ ♥ ♥ ♥
  
 
       Good morning my lovelies, Pinquette Mary here with a card using the extremely beautiful Angel stick pin from Pinque Peacock. These happen to be a personal favorite of mine and I can always find a wonderful use for them. Today I used it to make a very special card for my grand daughter. Let's take a look shall we:


     That's right Mia will be receiving her First Communion in a few weeks and she loves purple. I also love the Inspired Heart cartridge for my Cricut when I look for anything religious. I cut this at 5 1/2" because I wanted to add some embellishments and details. The card base is 5"x10" so this was a perfect size to use.
     The background cardstock is Mercury glass that I picked up @ Christmas but never had a chance to use. It really helps the girl stand out. For the veil I cut a tule circle in 1/8th to make it small enough for the girl. I gathered it up with some invisible thread so the stitching would not show. I also added a small piece of ribbon for the dress tie and finished with some stickles for the dress and sleeves.
     I used some pearls to give her a sweet pearl necklace and a few rhinestones to her veil for some bling.
     The flower is a mulberry one that I so I just added some glimmer spray to tie it in with the paper and also to show off my stick pin. I just happened to have this beautiful Angel with a purple bead! Usually I also add some 3 Girl Jam ribbon on my cards but this time I really wanted to have the stick pin show off as a focal point.
     I didn't want this to be too plain so I used a corner punch for the right hand top and bottom of the card and added some pearls to the Left corner for balance to off set the flower and stick pin.
The saying is a stamp I have had for a while and decided to layer it with a scrap piece of the mercury paper.
     Whew! Sometimes a clean and simple card can be a little more time consuming than you think!  I hope you will checkout the products at Pinque Peacock for they truly can make your project super special! 

     You can purchase these beauties .
   Did you know we have our 4th Challenge going on? This month we want to see what you can do with flowers. Just let those creative juices flow!


LINK UP YOUR PROJECT...
For Our 4th Challenge!
The theme for this challenge is
FLOWERS....
head on over and join in the fun!!!
Snag Our Badge
***************
     We also are showing you something new: our Crafty Kit Club. Be sure to stop over and see for yourself all the new and exciting news.

And then head on over to the NEW PINQUE PEACOCK Crafty Kit Club
Fan Page and check out all the rage there!!!!


I hope you have enjoyed this card and I sincerely wish you a very Blessed Easter and Passover.
~Mary


Monday, January 20, 2014

Baby Love Card

 Pinque Peacock

      Happy Monday fellow crafters! Pinquette Mary here to show you some Love. That's right, this month the Design Team is showcasing Pinque Peacock products with the theme being Love. To me, love can be that warm fuzzy feeling you get when you are with someone special, smell the most delightful meal cooking or even remember a moment in time that left you feeling happy all over. For my project I decide to dress up some baby cards I had done a while ago using great products to embellish my cards and to kick them up a notch, lol. We have a few really special people who are expecting babies and they are choosing not to find out what they are having so I hope I have enough cards, lol. Let's take a look at them.
     I used the Cricut cartridge Victorian Romance for this beautiful clown silhouette. I made this a while ago so I believe the size is 5.5".  It amazes me how I have grown creatively. I first made this card for a Design Team i was on and this is what I submitted. The theme may have been to use a silhouette however, today it looked so unfinished to me.

 This is the before.

      Here is the after:


     This baby boy card has the scrumptious 3 Girl Jam crinkle ribbon and a simply wonderful fabric 3/4"covered button in green and white from Pinque Peacock Shop. It adds so much dimension to this card and really looks like a bouncing ball! I also added some Baby Blue stickles to the solid side of the clown costume to add a little bling and also to tie in the background color. It seemed to be a good choice because it also brings out the polka dots in the button. Love when that happens! I also added some rhinestones to a scalloped border strip I had in my stash. I am so pleased with the "dressed up" version.

This is the before girl card:
    

And here is the after:
     For the girl card I added liquid pearls to her costume and a different type of 3/4" fabric button for her "ball". I also had a strip of embossed hearts left over from another project so I added this to the scalloped edging as well. I think it gives it a more polished looking card.
     Thank you so much for stopping by and I hope you will stop by the Pinque Peacock Shop HERE and grab some of these wonderful products and try them on your next project. Have a wonderful week and as always, stay safe.


Thursday, January 16, 2014

Love U Mixed Media Canvas

♥ ♥ ♥ WELCOME PRETTY LITTLE PEACOCKS ♥ ♥ ♥
Make sure to become a Follower 
                               then Stop by the 300 Follower Giveaway TO ENTER TODAY
   
     Happy Thursday! Pinquette Mary here with a little project for you today. Ok, it's not really a "little" project. I have been really tied up with one of my daughters having shoulder surgery. Nurse Mary has been on duty 24/7 when what I was anxious to do was to make a project with my awesome DT packet of goodies from Jessica at the Pinque Peacock, lol.
     Have you ever had a "vision" pop into your head when you just have to attempt it? Well, this was what happened with my project that I am going to show you today. Are you ready? Let's take a look....

      
     This is an 8"x10" canvas board that I used for my base. I wanted it to look like a tree trunk with the heart carved into it.  First I started by painting my canvas board with brown paint then let it dry overnight.

     I cut out a heart from contact paper with my Cricut. You can use any heart shape you choose from whatever cartridges you have. Next I used Rangers crackle paint in Picket Fence. I put it on quite heavy so I would get a bark look. I also wanted the heart to be smooth like a carving. You really don't have to be fussy since it all will be inked. You just want the crackle effect for bark.
     I think I used every dark colored distress ink I had on hand: vintage photo, walnut stain, antique linen, scattered straw and even black soot. You just have to keep playing until you get the effect you are looking for. I did not take the heart off until all the tree was distressed. This made it so much easier to add depth to the heart and I could concentrate on its outline.
     These metal letters are some I had hanging around and thought they were perfect for this project. I used some jewelry glue to adhere them as well as the lock and key.  The sentiment is computer generated and says: "Real love stories never have endings." I just tore the paper and burned the edges for a tattered look.
     Lastly I stamped the stems and leaves with StazOn ink. One spot I missed when I stamped them so I decided to add a few rhinestones for dew drops! Of course I also needed an arrow so I used a grunge board piece and painted it with Black Soot.
     How about these adorable flowers? Beautiful garden layered and swirl flowers from the Pinque Peacock. You can find these and so much more from the January Release we showcased @ this weekends Hop. Just be sure to check out the shop HERE .
     
     Hope you have enjoyed my project and, if you would like more info, just head on over to my blog HERE . I will give you all the details on how I created this. Have a fabulous weekend everyone!!!!!

Friday, July 12, 2013

Snow White Layout

~~~~ Click HERE for the 300 Blog Follower Giveaway ~~~~

Hello to all of our Pretty Little Peacocks

Welcome to Pinque Peacock’s
JULY New Release
"When You Wish Upon A Star"
BLOG HOP Day #1


WELCOME TO DAY #1 OF OUR BLOG HOP...

     Good Morning Pinquettes! Mary here and welcome to everyone's favorite theme Disney!!! If you have come from Shelley's  then you are in the right spot.If not then you want to start at the beginning HERE.
     Are you ready to see my project? We have been to Disney World many times so it is about time I scrap some of these pictures. The beautiful swirl flowers Jess sent me fit perfectly in this layout. So, here we go:

     
        This is probably one of the quickest layouts I have ever done. I just grabbed my pics and used the scalloped circle spellbinders and used them to cut the pictures and the layers of matting. I used a scrap piece of ribbon that was hanging around on my craft table (I never throw anything out, lol). This was a great way to to connect the 2 photos. Let's take a look at the Pinque Peacock Splendid Swirl flower and how I used it on this layout:
     Isn't this beautiful? I had a premade set of Snow White from Michaels and it had some cute jewels so I just stuck one in the center of the flower. Love the look of this. I also used one of the cute fabric covered buttons for the opposite side of the layout. 

     
     This was perfect so show Alexis love of the Princesses. Again I used some of the premades to scatter the flowers throughout the layout. To finish it all off I did some doodling around the edges and also some "grass" under Snow White so she had something to stand on!

     I am committed to using up supplies I already have so these rhinestone pieces were the first thing that came to mind with this layout. I also used a metal frame rather than a journal tag to complete the project.
     Although I have showed you how I used the Pinque Peacock supplies for this Disney layout, I hope you can see how useful they are no matter what project you are creating.
     Now its time to hop on over to Kimberly's and see what she has to wow you with!!!!

We hope you have enjoyed your time as you have hopped with us these past three days and that you feel
inspired to create after visiting the Talented Pinquettes' Blogs! This hop has showcased projects that have been created using some of the JULY NEW RELEASE Products from Pinque Peacock.

We are thrilled to have you joining us this month as this is a very special New Release of products and we are all so very excited to share it all with you! Our July Release is full of beautiful color palettes, wonderful inspiration from the Pinquettes, and fabulous sparkle and shine as we celebrate "Disney"

After hopping, be sure to visit the Pinque Peacock Shop on FB to order the New Release items to jazz up tons of your projects.


!!!!Now, let's talk about the
BLOG HOP PRIZE!!!!
One winner, who has hopped all 3 days (Friday, Saturday, and Sunday) of our Pinque Peacock MAY New Release and followed the RULES BELOW will win this . . .

6 SMALL SPLENDID SWIRLS
(mix and match to your liking)

AND

2 LARGE FLAT BACK BUTTONS
(select from any of the July Release Styles)


Here is How*:

1 – Hop to ALL of the stops over the course of the 3 Day Hop and comment at each Pinquette Blog (Lineup for all 3 Days is below)

2 – Follow the Pinque Peacock Blog and Facebook Page/Shop

3 – Follow EACH of the Pinquettes’ Personal Blogs who are participating as Hop Stops this weekend.

*You MUST do ALL of the steps above to be included in the random drawing for the prize. We would hate for you to lose out on winning just because you didn't follow these easy rules :(

The Hop will remain open until Wednesday, July 17th, at 8:00 a.m. EST.
The random drawing will be held sometime during the week that follows and announced by Wednesday, July 24th.

Now, if you find yourself Hopping off the Path on any of the three days, you can use this Lineup to get back on the Right Track . . .

DAY 1 (7/12/13):
1~ Pinque Peacock - http://pinquepeacock.blogspot.com
2~Shelley ~ http://shelley-scrapbookingforfun.blogspot.com
3~Mary ~ http://Mary-fortheloveofart.blogspot.com
4~Kimberly ~ http://scrappingrookie.blogspot.com
5~ Rhonda  ~ http://flowersbyrhonda.blogspot.com
6~ SHOP: https://www.facebook.com/PinquePeacock

*****

DAY 2 (7/13/13):

DAY 3 (7/14/13):

Thank You for hopping along and we hope you have Loads of Fun!
Peacock Hugs
~Jessica and the Pinquettes

Tuesday, June 4, 2013

Altered Box

  
     Good morning my fellow Divas! I'm Diva Mary and I am so happy to show you a neat project as a member of the Cricut Divas DT . Today I am going to show you what I did with an old box a wallet came in and how my Cricut helped me perform some magic. For this project I used my original and trusty Expression as well as the flower Shoppe and
Graphically speaking cartridges. Let's take a look shall we: ???????????????????????????????
      First I started with an empty box. I pulled out some scrap card stock and was lucky enough to find one that matched perfectly. I even had some pieces to make the flowers! These were cut @ 1" from the image on page 14 in Flower Shoppe. I cut all the layers in the handbook. I inked the edges and then spritzed them with some glimmer mist. here's a tip just in case you don't already know this. When making paper flowers it is best to ink first then mist. If you use the glimmer mist first, then the ink, the glimmer will get on your ink pad and that is not good for future projects. Just a little FYI.

  
     After some ink and glimmer mist the flowers were shaped. I already had some mulberry printed leaves so, a little perfect pearls helped to add some shimmer. The rhinestone is by Crystal It. These are so gorgeous in person.
???????????????????????????????
     I cut the butterfly and layer @ 1.25" and the phrase @ 1.50". These images are both found on page 57 in Graphically Speaking. You'll notice that part of the base layer on the butterfly is missing. I used the center point feature on my E but didn't set the blade in the right spot. I was not worried since the top layer would cover it. I added some Black Diamond Stickles to the top layer.  Here's the finished project:
???????????????????????????????
     I also added some ribbon to the edge of the cover to really tie it all together: A few black pearls in the corners added the finishing touch.
???????????????????????????????
     I used this box to give a few gift cards to my daughter for her birthday. Needless to say she loved it! I have some more info about this project on my blog: http://Mary-fortheloveofart.blogspot.com

Thursday, August 9, 2012

Princess Pixie

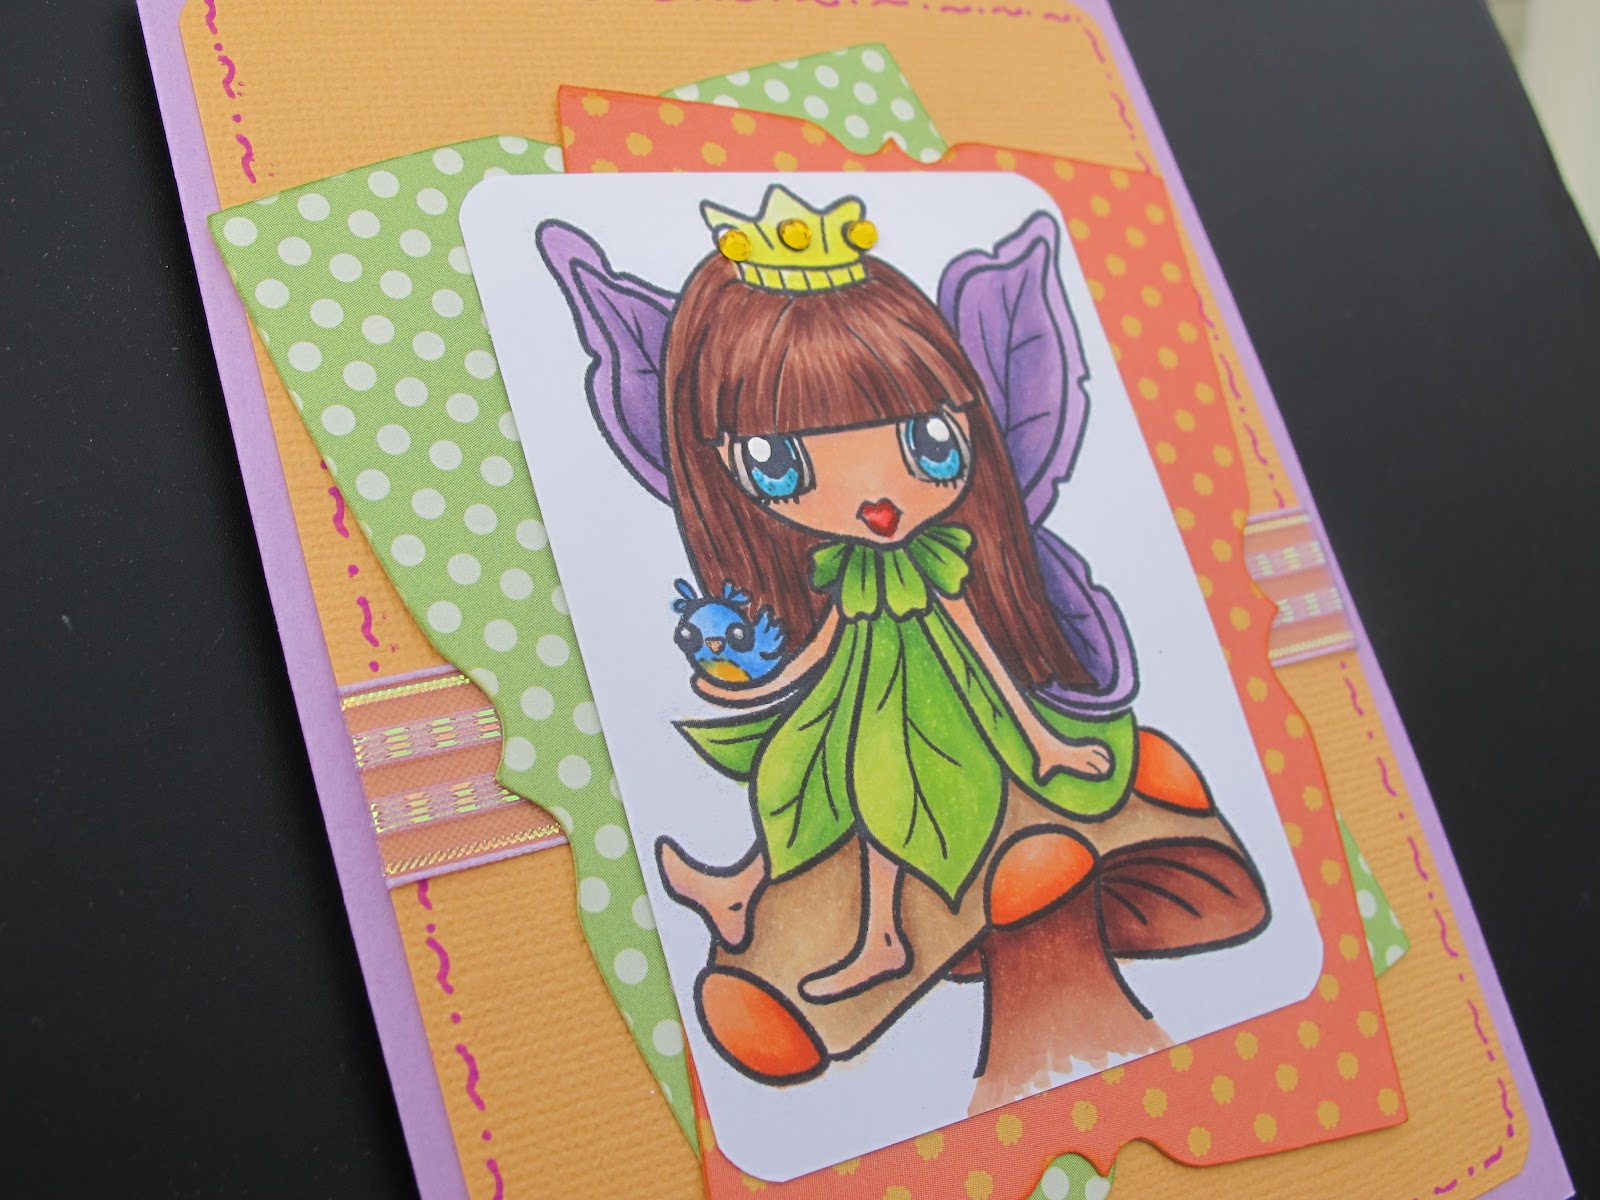
     Good morning to you all! I hope you are enjoying the remainder of the summer. Boy has it been humid!!! Today I am going to share another Copic project with you. The adorable digi stamp was a freebie bee from Pixie Dust Studios and I finally got a chance to color her. I have also included all the markers I used to color her. Are you ready???? Here she is:
     Isn't she just the cutest little fairy with that pixie face? I started with the scraps of paper that were hanging around on my craft table and used my Copic chart to match my marker colors. Boy that really made the coloring go fast!!!
     This close up will give your a better idea. Here are the colors I used and the order in which I colored the image:
Face: E000,E00,E01,BV00, R20
Eyes: BG0000,BG02,BG05,BG07,W1,W3,W7
Hair: E25,E29,E31
Dress: YG17,YG21,YG25
Wings: V12,V15,V19,BV25
Mouth: R20,R22,R24
Mushroom-cap: E50,E53,E57
   -underneath and stem: E13,E15,E18
   -dots- YR01, YR02,YR07
Bird body: B21,B24,B26,Y15,Y17
Crown: Y00,Y04,Y06

     I used the image from the Storybook cartridge by Provo Craft for the shaped pieces in the background. This can be found on page 67 of the hand book. A little doodling around the edge, some sparkly ribbon and of course some bling on the crown and she is done. I haven't decided on a sentiment yet but had so much fun coloring her.
     I hope you enjoy my creation and have a wonderful day.


Wednesday, June 15, 2011

Best Hand Made Soap Ever!

  Since the weather here has been so cold and dreary lately and since I have several gift occasions coming up (thank you's, house warmings, and just thinking of you gifts) I decided to make some home made gifts. OMG! My cyber friend Audrey had this recipe for home made soap so I thought I'd give it a try. This is so wonderful and easy to make. You can find the recipe here: http://cuteandsome.blogspot.com/2011/04/its-earth-day-gabys-happy-birthday-blog.html.
     Not only was it fun to make, it made the house smell wonderful! I decided to package up the first bottle as a Thank you for a friend of my daughters. I watch 3 of my grand children 2 days a week. The oldest one is in school so I have to drop him off in the morning and pick him up in the afternoon. The morning isn't bad because it's a drive through however, in the p.m. you have to go into the school to retrieve him. It's not bad but in the beginning of the year the baby was still in an infant carrier so it just killed my back. This kind lady offered to get Mattie so I wouldn't have to take the other 2 inside. I jumped at the chance since this winter was so brutal it certainly made my life easier. Anyway I wanted to give her a small token of my appreciation so, what better way than a nice personal gift.
     Audrey's recipe gives you the option of adding fragrant or not (it really doesn't need it) but I had some soap fragrances so I did add some. This particular one has an almond fragrance but some have a Lily of the Valley essence. I also added a silk flower stem to the bottle while filling it. After i hand wrote this tag I found a stash of Wilton tags that you can print on the computer so the others have a printed tag. I added a nice sheer fabric to the bottle top and decorated with silk flower.
     Now that I have my Imagine back, I made a Thank You card using Lori's Garden. The background paper is also done on the Imagine using Imagine More cart. ( Hint, I used this pattern on the wedding invitations I am dying to show you, lol).
     Finally I put it all together in a cute little gift bag. (or so I thought!). I had picked up a package of 12 bags for $1 @ the dollar store. They are so flimsy. I make much better ones using my cricut and my own card stock. Somethings you just shouldn't skimp on, lol.
     As a side note: I had a little soap left over but not enough to fill a bottle so I put some in a heart dish near my sink. When my grandson saw it he asked to try some. He must have washed his hands ten times just so he could use the soap. His verdict: "wow Mema this soap makes your hands so soft and it smells so good !". He actually asked to take a bottle home. Looks like I'll be making more soap in the future. Gotta love those 7 year olds!!!
  

Tuesday, June 14, 2011

Wrapping Paper Inspiration

     Wow it's been a while since I posted! Have no fear I have an exciting project to share! We have several weddings this summer/fall and that means Bridal Showers. I refuse to pay a lot for wrapping paper (I'd rather put the money into the gift) but I am still picky about something I can dress up.
     This paper was so cute with the wedding dresses and had cute sayings like "big hair", big dress" and "big day". I thought this was adorable to use for one of the showers I am attending. Sooo I decided to make a cute gift tag.
     I have been using a lot of shipping tags to alter lately. (I think I am hooked, lol). First I distressed the edges with Zutters Distrezz It All and added both blue and white spritz. While this dried I printed the phrases: big hair, big dress and big day. After inking the edges of the tag I embossed this dress from My Sentiments Exactly using a white opaque embossing powder.
     I wanted to add some dimension to the dress so I gathered up some sheer netting and after gluing it to the waist I added a satin bow. The bodice needed something so I added some imaginisce rhinestones and finished the tag off with a nice fluffy satin bow. (Big of course!!).
     One other thing I love to do is wrap the present with tulle rather than ribbon. I find it cheaper and gives a soft look and is appropriate for wedding, shower, birthday or baby gift and it is so economical!

Tuesday, April 19, 2011

Japanese Girl Birthday Card

     Well I guess these copic classes are worth it. This weeks lesson was to focus on light source and choose copic markers to compliment your paper. We also were allowed to use our own stamp whether you used a digital or stamped image. One thing I learned (among others) was the proper ink to use with copics.  Memento ink wins hands down. Now I know why I ruined some of my markers! Some inks ruin your marker tips. Guess I should have taken a class to begin with. Thankfully I hadn't wrecked too many.
     There just happened to be a challenge at Just Us Girls (JUGS80) for colors I really love: aqua, kraft, black and coral. It also has to be a birthday card. So, in keeping with my class lesson I picked my paper first, then looked to see if I had markers that would co ordinate. So this beautiful lady is what I came up with. The image is perfect since the background paper has a sort of cherry blossom feel to it.
     Once the coloring was done I cut the image with a Spellbinders die and chalked the edges. Oh the image is a Recollection stamp I bought at Michaels. The main image is on pop dots and has recollection rhinestones in the corners. It is rare I don't use Creative Charms gems but I have used all my blue. Time to order some since although these rhinestones match perfectly, they do not have the sparkle CC's have.

Wednesday, April 13, 2011

Creative Charms Design Team Call

     The people who follow my blog know how much I rave about the quality of  Creative Charms embellishments. That is why I have decided to try out for their design team. I figure since they are my go to company for their gradient gems , brads, jewels etc. I might as well show them what I have been sharing with you guys. Diane Campbell Payne @ Capadia Designs shared these kits of the month with me through her blog and I have to admit I am hooked.
    
       This really is a simple A2 card (4.25" x 5.50"). The pink card stock is matted with white card stock followed by a plum print and is stitched with a beautiful metallic thread. I used Provo Craft's New Arrival to cut the "baby" scalloped squares. These were cut at 1" and included the shadow feature.  The distressed ink in milled lavender really helps to make the squares pop.
     Now for the fun part! I used a stamp from Inkadinkado and decided to emboss it. I used a flourish stamp with versmark's Dazzle Frost and Zing's metallic finish in silver. Before I adhered all this together I punched two ribbon slots on the fold side and threaded some ribbon so I could make a nice bow to add some interest to the side.
     Here's the exciting "pazzas" part. One of the kits I bought from Creative Charms was the Blooming Garden which had these sparkly pink flowers as well as some felt embellishments. They really brought the card to life. In order to make my silver "stem" show up more I pulled out another kit I had and added some green gradient jewels as well along the stem. Since I wanted to finish the side with my bow a little more I added a clear gradient gem to either corner on this side. Voila, there you have a beautiful baby card fit for the newest princess!
     Wait until you see what I've come up with for the kids table for Easter. Can I just say it has to do with a Blooming Garden, lol.

Wednesday, January 12, 2011

Joan's Gardens week #1 Challenge

   Well with all the snow we got today (18" +) it was a great day to do some challenges. After the laundry was done, cookies baked and supper over with it was time to set about a challenge. Joan's gardens has some beautiful projects over there and I finally have the confidence to enter their first challenge of the year. First it had to include an animal or bird (check) had to use a floral back ground (check) a die of some sort ( check) and something out of your comfort zone (UGH!).
   One of my personal goals this year is to use up some of my stash of scrap paper. This background paper seemed to be perfect for the background paper. I also had this negative image leftover from  another scrap project. At first I was going to use a Spellbinder die but I really loved how this sort of looked like a sign so I went with a simple stamp "There's a song in the air".
   The easy part was to use an image from my cricut library French Manor for the bird and birdcage. Now came the hard part: something out of my comfort zone. Okay so I have a confession: I'm a hoarder. Yup it's true and one of the things I've been hoarding is anything by Tim Holtz.  So it was finally time to pull out the grunge paper and gold dabber paint. I love how this came out! What a great dimension this paper gives! Everything was inked with Ranger distress ink antique linen.
   I also decided to use a Martha Stewart punch for this beautiful butterfly. Of course the front would not be complete without bling so I added some pale blue rhinestones.
   I also love to complete the inside of my cards so I used the Spellbinders Labels Ten (3 1/2") size stamped the sentiment and then shaded embossed area with blue chalk.
   Not bad for a card made out of scraps! Great start to the New Year!!

Monday, November 15, 2010

I Love Bling

Ok so I haven't been hiding honest! I have been busy doing all kinds of things. Finishing up some on line classes. ( I still have techniques to finish learning). I also had to take a break in order to make some jewelry for Fran's customer appreciation day. (I felt the women were as tired of tools as I am. These are so much fun to make and way cheaper than the European style bracelets! I love adding crystal elements for that touch of glitz. I do have some listed on my Etsy store if you'd care to take a peak.
Bathing suit charm
Sea Shell charm

Little White Purse

High heels

Who loves you

Turtle and dolphin