Friday, January 18, 2013

Snap Band Wrist Corsage

Cricut Expression 2 Blogger Bundle
     Hello my fellow crafters! I thought I'd share a special project I have been working on. I have to admit I loved being a floral designer and I especially loved when I could get creative for those really important occasions. With the school dance season upon us I thought I'd try and use some paper flower dies and make a wrist corsage out of paper flowers. Here's a peek:
     These are so easy to make, really. First I used Flower Shoppe cartridge by ProvoCraft and cut some flower shapes of all different sizes from 1" up to 1 3/4" sizes. I used some left over cream card stock and spritzed it with white Smooch Sprtiz by Clearsnap. I rolled the wet paper up into a ball and carefully unrolled them. Then I stacked them alternating sizes and glued the layers with a small dab of glue in the center of each flower.
     I also did some with scraps of left over double sided pink card stock. These have a rhinestone in the center but I also added some glitter to the edges of the petals. I just wanted to let you know that I have MANY Cricut machines but for this project I used my Expression 2. One of the best features to this machine is that (like the Imagine) you can actually set the paper size. For example, if I have a piece of card stock that is 3.5" x 4", with the E2 I can actually set my mat to show that exact size piece of paper so I have an idea whether my cut will fit on my mat at this small size. Right now, Cricut.com is having an excellent bundle sale on this machine and you can see it HERE. Oh how I digress, lol. I just had to share my excitement!
     Here is a view of the snap band. I love these since they hug the wrist so perfectly.I always felt bad with the real flowers how the wrist bands never seemed to fit the littlest girls but there is no problem with these. I also sprayed the flowers with an acrylic spray so that they are somewhat sealed from the elements. I  added some feathers for a fun look. Everything was glued with Beacon's 3 in 1 glue.
     Well, back to organizing my craft space!!! I will start this year off right!!! Hope you all have a wonderful week end~Hugs


Tuesday, January 15, 2013

For Your Eyes Only


     Happy Wednesday my favorite peeps! I hope you are all doing well. I took a break from my craft room make over and did some crafting (surprise!!!). Today @ My Cricut Craft Room Erica the Design Team to make something with a hidden element. I decided to make a card with the flower closure from the cart CTMH Artiste.
     First I started with the cut on page 35 and used the card feature @ 3.5" high.This gave me enough room to make 3 cute note cards from a 12" x 12" piece of card stock. My back ground paper is from DCWV Nana's Nursery Baby Girl. I wanted to dress it up as well as use some of my scraps so I added a cream card stock to layer a piece of music paper. All the layers as well as the flower were inked with the following Distress Inks: Victorian Velvet, Tattered Rose and Gathered Twigs.
     I love having an interactive element which means, you have to slide the flower open in order to get at peek at the inside. It is hard to see in this picture, but, I painted the flower with some Rangers Distress Stickles to add a touch of sparkle. These Stickles can be heated with a heat gun, unlike the regular Stickles.
Are you ready to see the inside?
     TaDa!!! I usually use a stamped image on the outside but this time added it to the inside! I am not quite sure who the stamp is by but I can tell you it has been on my craft table screaming to be colored for a lond time. The markers I used were by Sakura and are the Gold Shadow Gelly Rolls. These are so neat since they leave a soft gold ting to the marker color. It is so pretty in person. I also used their Glaze pens on this image.
     I can see a whole set of these note cards in my future! I hope I have inspired you somewhat today. Do you make notecards to keep on hand? I'd love to know that I am not alone. Now be sure to head back over to My Cricut Craft Room and see what's "for your eyes only".


Monday, January 14, 2013

My New Venture-Wickless Candles!

     I just had to share my new business venture: Scentsy. I had such great luck with my Velata business that I decided to jump into their fragrance line as well! I thought I'd explain a bit as well as share with you the pleasures and "opening" day.
     In case you haven't heard about Scentsy let me enlighten you somewhat. This company has a direct sales concept which means, you order directly from a consultant (that's me, lol) and they ship directly to you as the host of a party. They sell a wickless wax "candle" and warmers that are melted with the aid of a light bulb.You read that correctly, with a light bulb, not a flame candle. This makes them safe for use in college dorms, nursing homes etc. While the light bulb melts the wax it does not get overly hot so you don't have to worry about getting burned on hot wax.
     Above is an example of just one of the full size warmers. There are so many different styles to choose from to fit any decor.
     There are even smaller ones that are perfect for the bedroom or bath. Again there are many styles to chose from. Below is what the fragrance pack looks like:
     This happens to be one of my favorites! The wax cubes come 9 to a block. One block /cube lasts for up to 8 hours. Unlike regular candles, with these you have the same great scent every time you add or replace a cube. How cool is that. I hate when I burn a candle and it starts out smelling super but the scent doesn't last to the end of the jar. Another plus is that I am not stuck with the same scent until the candle is gone but can change it up depending on my mood.


     Another great thing about this company is the promotions they have. Each month they have a charity cause warmer. They have had them for Special Olympics, Breast Cancer, Autism etc. They do have one coming out for Alzheimer's as well so you will want to pay close attention when I post the cause of the month. We also carry warmers for various colleges. Want to see if yours is among them? You can check it out HERE .
     I thought I'd let you share in my enthusiasm on the day my kit arrived. It happened to be a day when my grandchildren were here. (Their mother also sells Scentsy). Here we go.....

The enthusiasm is contagious!!!

I see a warmer!

Yeah, a Scentsy Buddie for baby. How cool is this?

Catalogs, order forms, extra light bulbs, scent pack, fragrance bars....

Sample scents, all 87 of them!

CeCe's turn to hold the Scentsy Buddie, lol. They were so excited it was the Penny The Pig!

     So there you have it my starter kit! If you don't have a consultant yet or would like to learn more, just leave me your email or you can order directly from my open party HERE.
     Best of all there is a special this month where if you book and close a party of $150.00 or more before Jan. 31st you can purchase double the rewards for half off. That means you can buy warmers for more rooms in your house, yeah!!!!  Do you know who deserves this for V-Day?

     Thanks for stopping by today. I'm giving my craft room a make over. Wish me luck!!!!


Monday, January 7, 2013

Thank You Card


     Good morning my fellow crafters and welcome to all my new followers. I really appreciate your taking the time to follow me and hope that in some way I can inspire you. This year I am challenging myself to use some of my least (or never) used carts and really explore their potential.
     This week Erica @ My Cricut Craft Room asked us to create a Thank You card so I deided to pull my Sophie cart. Here's the cut from page 45 that I used:
     This is just 2 cuts. I love that it is such an easy card to make. I chose and cut  @ 2.50" for the top and the shadow @ 2.75" for a more layered look. the stamp is from Inkadinkadoo's Just Saying set.

     I also used Spellbinders Large Scalloped Ovals to provide another layer. The stamped label was then applied with pop dots. Since the background card had a touch of blue in it, I decided to add some ribbon and blue rhinestones to pull it all together. I had bought a set of premade cards from DCWV, so, when I am in a hurry or just want to focus on my die, I always go to this set.
     I used the blue rhinestones as the flower centers and also carried it over to the image already on the card base.
     Now pull out those less used carts and see what you can create! Thanks for stopping by and be sure to head back over to My Cricut Craft Room and see more inspiration from my DT Sisters.


Get the Cricut Expression 2 for ONLY $299.99!
New To Under Armour - The Under Armour Revolutionary ARMOUR BRA 137790_Free Next Day Shipping On Orders of $150 or More at Under Armour

Friday, January 4, 2013

Ericas January Blog Hop 2013


Welcome to Erica's Craft Room
100 Cricut Cartridge Blog Hop

You should have started at http://mycricutcraftroom.blogspot.com/ if not please start at the beginning

  
 Happy New Year and welcome to the first Hop of the New Year over @ My Cricut Craft Room. I hope you all made through the holidays and are ready to do some crafting. If you just came from Lisa's then you are in the right place. If not then you want to start at the beginning so you don't miss any of these fabulous projects.
     Each month the Design Team shows you 100 carts and many of the projects you can create with them. This month Erica asked us to use 5 different carts. I made mostly cards and a cute little box from the following carts: Victorian Romance, Paper Dolls teen Scene, Sweet Tooth Boxes, Hello kitty Greetings and Superman.
     Since I have 8 grandchildren I decided to use this month's hop and get a head start on some Valentines' Day projects.I hope this will give you some incentive to get going as well. So, let's get started:
     I plan to make some shaped cards this year to challenge myself  and I found the perfect one to start with on Hello Kitty Greetings. This image was found on page 51 using the card feature @ 3.25". I love the glittered card stock for the wings, however the heart had a few spaces I wasn't happy with so I decided to add some liquid pearls to the outline. The stamps are Pink By Design "Laughy Taffy". One of my grand daughters is going to love this!
     I was so excited to finally use this cart. This image is from Paper Dolls Teen Scene . The image is on page 27 and all the layers were cut @ 5". The image s-rain, s-rain s for the body was cut in black + shift body in cream. I used wardrobe layer 2 and wardrobe 2 for the clothing. I just love the skates and, since one of my grand daughters takes ice skating, I'm sure she will love this card.

I added some waterfall stickles to the edge of the skirt and some chalk from Pebbles, Inc for the cheeks. (It's pretty cold in those arenas, lol). She looks like she is holding a heart from the background paper. (Yes I planned it that way!).

I used some scrap pieces to make the background, added some faux stitching around the edge and I tag I had left over from last year.
     I love to make boxes for place settings as well as gifts so I had to make one for V-Day. Although I  have both the TBBM carts, I also love the ones on Sweet Tooth Boxes. You can find this one on page 21 + . I used the left over scraps from the above card to cut small squares to add to my box. The double heart cut out on the front of the box is from a punch.
     The insert of clear acrylic is from the blister pack my carts come from. I always cut them up to use for projects just like this! I decided to dress it up a little by adding ribbon to the inside and out of my lid.
     I thought it looked a little plain so I used a Martha Stewart Branch punch for the leaves and some Prima flowers with silver heart brads to add to the top of the box.
     Enough of the girlie stuff. Since I have 5 grandsons, I used Superman for an out of this world card.
     I LOVE how this came out. I haven't decided whether this will be for V-Day or a birthday but, either way it will work. This cut can be found on page 28 and I cut it @ 3.50". 
     The "POW" is under fonts and I cut it with the shadow @ 1" high. It was a silhouette cut yet I liked the bold inside cut so I went with that. The background paper I have had in my stash and acts like a mulberry paper. It adds so much with the embossed silver stars. Ready for some action?
     You guessed it. It is on an action wobble. These things are just so fabulous to work with. Now for my last project. I made both a boy and a girl version using Victorian Romance.

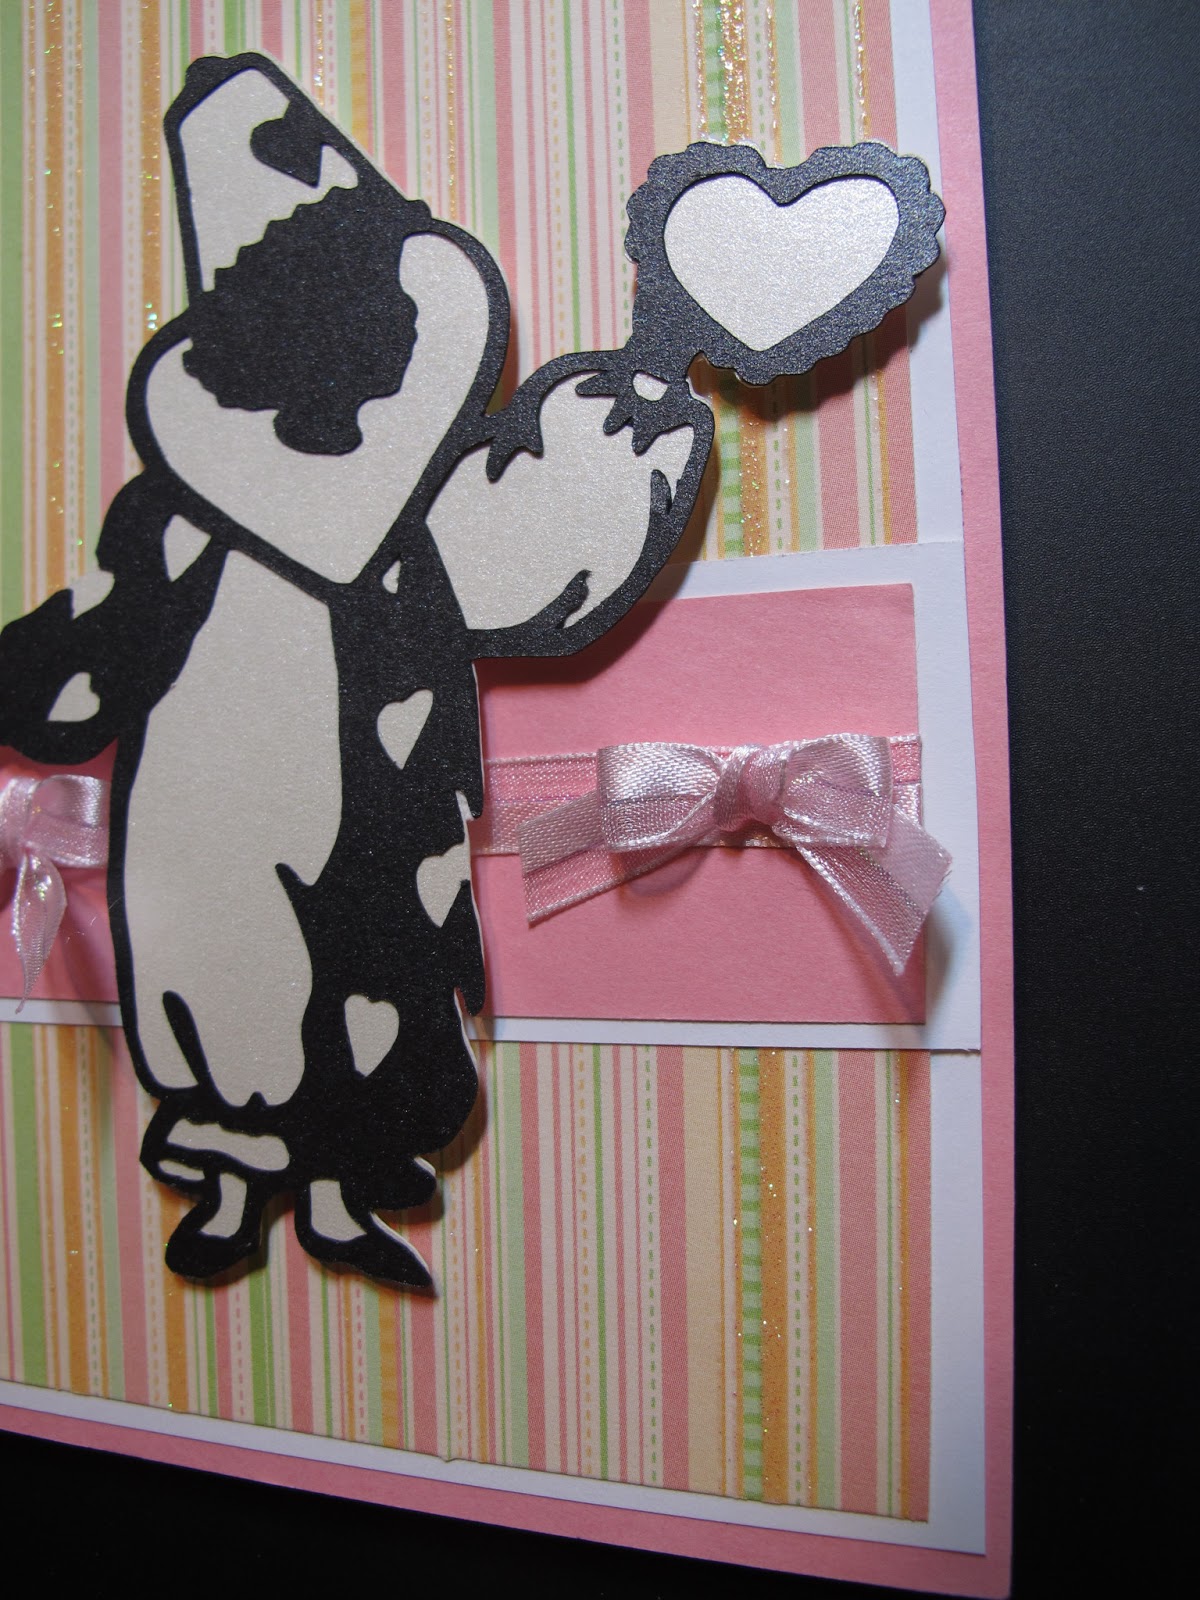
     I was going to make another V-Day card but this image really caught my eye. It's the clown image and only has 2 cuts. What a sweet die cut this is with the silhouette as well. I think this would make a great baby card. I left the bottom right corner with enough space to add a round tag, maybe a congrats message. Here's the girl version:
     This could be for a birthday, congrats baby card and yes, even a Valentines' Day card, lol.
     Both clown cards were raised with pop dots for some dimension.
     I hope I have given you a little inspiration today. I would love if you would tell me what crafting goals you have for the New Year. Mine is to challenge myself to use the carts I have purchased but never used (Shocker!!!) and to make some different style and shaped cards this year.
     Now be sure to hop on over to Robin's and see what crafting goodness she has created to share with you today.
     Here's the line up in case you get lost along the way:
Start http://mycricutcraftroom.blogspot.com/
Jamie M. http://craftygirl21.blogspot.com/ -
Lisa LeMay - http://scrapnooker.blogspot.com/ -
Mary M http://Mary-fortheloveofart.blogspot.com/ -
Robin Carroll - http://cutonedesignsbyrobin.blogspot.com/ -
Erica's Projects - http://ericasprojects.blogspot.com/
Samantha - http://www.samanthascricutcreations.blogspot.com/
Sarah - http://craftingwithsarah.blogspot.com/ -
Sarah Mae - http://itswhatkeepsmesane.blogspot.com/ -
Tami - http://scrappinrabbitdesigns.blogspot.com/ -
Erica's Blog Candy http://ericasblogcandy.blogspot.com/


Vinyl Blogger Bundle