Thursday, August 16, 2012

Welcome To Motherhood!

     Here is another wonderful image from Pixie Dust Studios. I am getting so much more comfortable with my Copic markers. I loved this image when I first saw it and thankfully I had an occasion to make a card.
     We have some wonderful friends whose daughter is pregnant with her first child and is due in a few weeks. She is just like one of my daughters so I had to make a really special card for her. She has blonde hair so this was fun to color.
     I used the following colors to do her hair:
Y00,Y11,Y21,Y23 and Y28 for shading. 
     When you do hair it is more like laying down colors rather than blending so you get individual strands of hair. I just kept feathering in colors until I got the right effect. Believe it or not the Y28 is a wonderful color color to use for blonde hair. It seems to make the other colors pop.
     I am still practicing on the facial tones but, for now, these are the colors I used:
E000,E00,E01 and R20 for blush
     Since Becca wants to be surprised, she and John have opted not to find out what they are having so I colored the clothing with a pink top and blue jeans.
Shirt: R81,R83, R85
Jeans: B91,B93,B95,B97
Shoes: E25,E27,E29
Heart: R22,R24,R27
     I added some liquid pearls to the bracelet. The background card is from a stack I have. I also added some  flowers I spritzed with Glimmer Mist and added leaves from a Martha Stewart punch.
     Once the image was colored, I hand cut around the edge and mounted on ovals I cut with Spellbinders. Easy peasy!!! I'll be back later with the same image as a brunette.   
     As always I would love to hear what you think. Hugs for now. 


Monday, August 13, 2012

Thinking Of You


     Hi you happy crafters you!!! Today Erica's Design Team was asked to create a Thinking Of You card. I had some stamped images I had done a while ago and hit a creative block. Nothing, no mojo at all. So when I signed up for this day at My Cricut Craft Room, I decided it was time to do something with this.
     I started with the "Snowy Park" stamp by Penny Black and used Tim Holtz distress markers to color the background. Before I stamped the image on watercolor paper, I spritzed it first with some water for a muted effect.
        It is hard to see in this photo but I used some flower soft at the bottom of the picture to add some texture. Now I wanted to add a frame, but how? Well it was time to use CDS.
     I found a card base with a rectangle aperture on Beyond Birthdays cartridge. You can find this on the card feature and it is the 1st button on the left.In order to fit my image, I sized it @ 7.798 x 5.37". This was a nice size card, however, I only needed the front part for the frame. So, I used the design Studio, flipped the design and then moved it off the mat for the part I did not need. This cut perfectly and was just the right size!
     I wanted to really bring out the wood features of the stamped image so I used the branches embossing folder for the Cuttlebug. I inked the folder with Frayed Burlap before I embossed the frame to get this really cool look. I also added a clear plastic so the picture would really look framed. The sentiment was a rub on and went so nicely with the overall look I was trying to achieve. It also was a great way to keep the flower soft intact.
     Speaking of Flower Soft, thanks to Erica for sending me some. You can buy the products I used here in Erica's Store.
     I used the My Favorite Things rub on to add the greeting on the inside.
     I hope you have enjoyed this project and hope you will head back over to My Cricut Craft Room and see what the rest of the Team has to show you.Your almost over Hump Day  (the week end starts in 2 more days, Whoot!!!).


Thursday, August 9, 2012

Princess Pixie

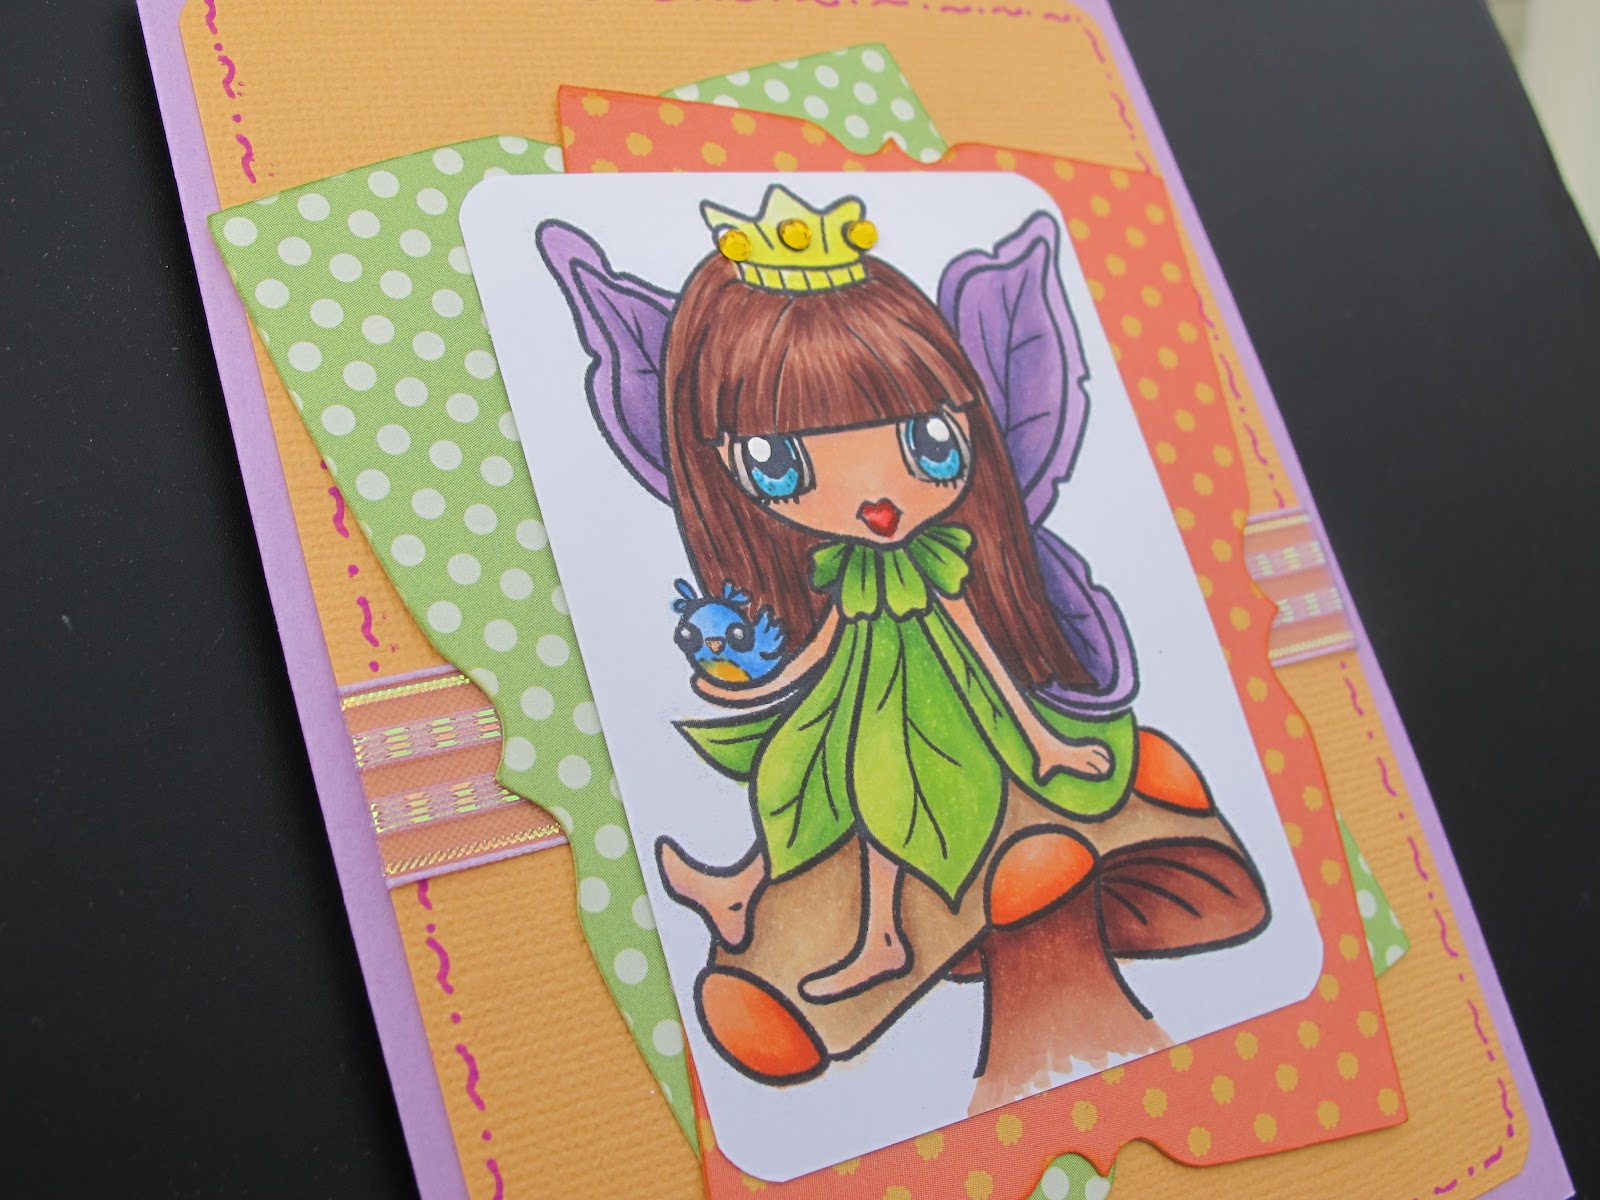
     Good morning to you all! I hope you are enjoying the remainder of the summer. Boy has it been humid!!! Today I am going to share another Copic project with you. The adorable digi stamp was a freebie bee from Pixie Dust Studios and I finally got a chance to color her. I have also included all the markers I used to color her. Are you ready???? Here she is:
     Isn't she just the cutest little fairy with that pixie face? I started with the scraps of paper that were hanging around on my craft table and used my Copic chart to match my marker colors. Boy that really made the coloring go fast!!!
     This close up will give your a better idea. Here are the colors I used and the order in which I colored the image:
Face: E000,E00,E01,BV00, R20
Eyes: BG0000,BG02,BG05,BG07,W1,W3,W7
Hair: E25,E29,E31
Dress: YG17,YG21,YG25
Wings: V12,V15,V19,BV25
Mouth: R20,R22,R24
Mushroom-cap: E50,E53,E57
   -underneath and stem: E13,E15,E18
   -dots- YR01, YR02,YR07
Bird body: B21,B24,B26,Y15,Y17
Crown: Y00,Y04,Y06

     I used the image from the Storybook cartridge by Provo Craft for the shaped pieces in the background. This can be found on page 67 of the hand book. A little doodling around the edge, some sparkly ribbon and of course some bling on the crown and she is done. I haven't decided on a sentiment yet but had so much fun coloring her.
     I hope you enjoy my creation and have a wonderful day.


Tuesday, August 7, 2012

Batman Door Hanger


     Welcome to My Cricut Craft Room  aka: WYEGW. Members of the Design Team were asked to use a phrase for our challenge this week but the catch is we could not use a main image but had to use the feature keys. This is such a great way to really explore your carts. For my project I am using Batman: The Brave and the Bold.
     Since we no longer have any children at home (yup believe it or not all 5 are out on their own! Once they graduated college they flew the coop and all are married except for the youngest.) Anyways I digress. I do watch 3 of the grand children 2 days a week and the oldest being 8 years old needed a space of his own. He took over one of the bedrooms but needed a sign to let his young sisters know he needed quiet time. Therefore I decided to make a door hanger for him. Here we go with the details:
     The door hanger is on page 73 and I cut it @ 7". I cut 3 layers in order to make it stronger.The phrase is on the same page using the feature key Layers:outfit. I cut this @ 5.50" and the shadow in black. I am going to show you how I deal with gluing on the individual letters when they are not welded together.
     I weed out the card stock that I am not going to use then, before I remove them from the mat, I use transfer tape and burnish well to make sure the letters are intact. You don't have to worry about it ripping the card stock because it is not really that sticky just supportive enough so the letters don't move.
     This is before I weeded out the card stock.

It also helps to trim the extra card stock down to size making it easier to line up on the shadow piece for placement purposes.
     As you can see I am able to nicely see where to place this on the shadow piece. While I had it on the transfer tape I used my Zig pen to glue it up and then just positioned on the bottom layer.
     Here is where I got into trouble, lol!!! I thought I would use my Xyron double sided laminate to keep it clean. No problem just load it in and crank it through. Trouble is I didn't make sure the laminate was under the bar like it was suppose to be. Here is what I ended up with:
     Will you just look at those creases !@#$%. I was going to start over but thought there must be a way to salvage this. Erica to the rescue. She always sends us extra goodies in our orders and guess what? I found these cute arrow eyelets in my stash. Look how I used them:


     Not only did I find the perfect phrase for WYEGW but I found the perfect way to salvage a project. If I didn't show you my boo boo WYEG  that there was a major mistake hidden in the project, lol.
     You can find this cart as well as all the supplies I used in this door hanger over at Erica's Store. She always has the best prices. Now please stop back @ My Cricut Craft Room and see what my fellow team members have to inspire you.
     As always I love hearing your thoughts on my project so please feel free to leave a comment.


Saturday, August 4, 2012

Erica's 100 Cart Blog Hop


August 100 Cartridge Hop Line up


Welcome to Erica's Craft Room
100 Cricut Cartridge Blog Hop Day TWO

You should have started at http://mycricutcraftroom.blogspot.com/ if not please start at the
 beginning


Welcome to My Cricut Craft Room's August 100 Cartridge Blog Hop

Collectively the design team uses over 100 different Cricut Cartridges in their projects during 


the two days of this hop. Sunday the new members of the design team will be announced 


and some have even made a project to share with you!! What an exciting weekend!!

As special treat enjoy 10% off of your total purchase with Erica's Craft Room Store.
Use the code AUGUST to see 10% off of your total purchase (No exclusions)


     Welcome to My Cricut Craft Room and our monthly hop. If you just came from Janet's 
 http://janetscreativeworld.blogspot.com/   then you are in the right place 
Each month the  Design Team make projects using at least 3 Cricut cartridges.
This is a fabulous way for you to view all kinds of paper crafting using great dies cuts
from these cartridges. I used 3 different Imagine carts:

Lori's Garden, Greeting Cards Inside And Out and finally, Santa's Village. 


     Since we have been watching the Olympics I thought I would make some prize
 bags for 2 of my grandchildren who complete swim lessons this week.

     This actually started as a card from Greeting Cards Inside And Out. 
The trophy card  is on page 19 of the handbook and cut it @ 4.2".
I used the images on page 21 with the layers separate. 
The finger was cut @ 5" and the labels @ 3.5".  I also added some glossy accents
to the trophy to add a little shine. The no. 1 was also  raised up with a pop dot.

Okay, so I am not giving them a medal but I am giving them googles and 
diving sticks to practice their skills.I'm not sure we have Olympic swimmers 
but their baby sister is showing great promise as a gymnast!
     My next project is a card I made using Lori's garden. Can I just say
how much I love this cart?  It has to be the greatest Imagine cart there is. 
I used the birdcage on page 3 using the cut and print feature @ 2" on off white 
or cream card stock.I also cut the branch from page 31 @ 1.3".


 I inked the edges of my card stock with frayed burlap and faded jeans distress inks.  
Of course I needed to do some embossing so I used a cuttlebug border. I decided to use the recessed
part rather than the raised edge. Just call it creative licence, lol.

     Now for the fun part. I used some white and opaque Liquid Pearls to the birdcage 
as well as frosted Aqua and green Smooch.

     I used some Cinnamon Stickles for the flower centers and finally the sentiment from
 PBD Stamps. This sentiment is from their "Grandparents" set.
     My finally project is from the Imagine cart Santa's Village. Every year on Christmas Eve 
we gather the youngsters to go outside and sprinkle reindeer food so Santa's sleigh won't miss us! 
I thought I'd get a head  start and make some cute "boxes" to put the food in. 
     I started with the pillow box from Girl's Make-Up Party. The image I used was  
which I sized  @ 3.5". This striped printed background paper is from Santa's Village 
on page 36. Print, cut=done! I then used the reindeer tag on page 32 @ 2". I wanted a vintage look
so I inked the edges with tea Dye distress ink.
Before I adhered the tag, I used some red satin ribbon to tie it closed and added a bell so
the reindeer will hear us.
     I'll wait until we get close to the holidays and then mix up some reindeer food: oats, sugar and (of course)
glitter so it sparkles!!!
         I hope you have enjoyed my projects for this Hop. Be sure to stop over at Erica's Store to get in 
on the deals. Next you want to head over to the lovely Lisa:
                                 http://lisacustomscrapbooking.blogspot.com 
to see her amazing projects. Here's the line up in case you get lost along the way: